Quantcast
Channel: Cloudbase Solutions
Viewing all 83 articles
Browse latest View live

SD here we come

$
0
0

Here we go, brand new site and great new products to show at the OpenStack Summit in San Diego. :-)

We did a huge amount of work lately bringing OpenStack to the Microsoft world, including the new Hyper-V Nova Compute driver, accepted in the OpenStack source code in time for the Folsom release!

Check out our installer for deploying the compute driver on Hyper-V and if you’ll come to visit us in San Diego we will show you what we are working on for the Grizzly release… you won’t be disappointed, promise ;-)

The post SD here we come appeared first on Cloudbase Solutions.


Using FreeRDP to connect to the Hyper-V console

$
0
0

Accessing Microsoft’s Hyper-V console is typically performed by running Hyper-V Manager / vmconnect on a Windows Server host or Windows 7 / 8 equipped with RSAT.

There are unfortunately quite a few limitations in this approach, including the fact that is not available on the Hyper-V host itself or on other operating systems.

Hyper-V console access is based on an extension of the RDP protocol, which is implemented in the Remote Desktop Services ActiveX Client control (mstscax.dll) used by vmconnect and by the RDP client itself (mstsc.exe).

Enter FreeRDP

Microsoft opened up their RDP protocol, including the extensions required by Hyper-V, which led to having FreeRDP implementing it. FreeRDP is without any doubt one of the most promising open source projects in terms of interoperability with the Microsoft world with a great developers team behind it.

The great news is that it’s now possible to access a Hyper-V console from Windows, Linux and Mac OS X. Here’s how. I’m going to present a “hard”, way using directly FreeRDP and a easier way using a Powershell script to get the required details from HyperV.

Support for Hyper-V is not yet available in the latest FreeRDP release, so all you need to do is to download the latest sources and compile them. To spare you some work here are the precompiled binaries for Windows. As a prerequisite you need to install the Visual C++ 2012 x86 runtime.

Connecting with FreeRDP

First you need to get the Id of the VM to which you want to connect. This can be done in Powershell on Windows Server / Hyper-V Server 2012 or Windows 8 with:

Get-VM <vmname> | Select-Object Id

On Windows Server / Hyper-V Server 2008 and 2008 R2 you can use PSHyperV as the Cmdlets introduced with the new Hyper-V version are not available.

To connect from Linux or Mac OS X:

xfreerdp –ignore-certificate –no-nego -u <username> –pcb <vmid> -t 2179  <hypervhost>

On Windows you can use the same command line but authentication is handled by the OS. In particular, in order to connect to a different host not in the same domain or without passthrough authentication you can use cmdkey.

wfreerdp –ignore-certificate –no-nego  –pcb <vmid> -t 2179  <hypervhost>

If you need to authenticate on the server, before wfreerdp run:

cmdkey /add:<hypervhost> /user:<username> /pass

A Powershell Cmdlet to ease up things.

The process described above, involving getting the VM Id before running FreeRDP might become a bit annoying if you need to do it frequently. Here’s also a Powershell Cmdlet that I wrote to simplify your work.

Some examples.

First you need to enable the execution of Powershell scripts on the host if you didn’t do it before:

Set-ExecutionPolicy RemoteSigned

Now you can import the module:

Import-Module .\PSFreeRDP.ps1

Now, to access the console on the “instance-00000001″ virtual machine on the local Hyper-V host:

Get-VMConsole instance-00000001

To access the console of a VM on a remote server:

Get-VMConsole instance-00000001 -HyperVHost RemoteServer

To access the console on all the running instances (be careful! :-) ):

Get-VM | where {$_.State -eq “Running”} | Get-VMConsole

As you can see some Powershell magic can ease up a lot of work!

Download FreeRDP for Windows and Powershell Cmdlet

We love FreeRDP to the point that we bundled it with our OpenStack installer. This way the entire Hyper-V compute management can be done in a completely autonomous way.

The post Using FreeRDP to connect to the Hyper-V console appeared first on Cloudbase Solutions.

Installing OpenStack Nova Compute on Hyper-V

$
0
0

We did a lot of work this year on OpenStack and Hyper-V integration, with the result of bringing back Hyper-V in the Nova sources in time for the Folsom release. We are currently working on a lot of cool features to be released in time for Grizzly, so stay tuned!

One of our goals was being able to install and configure Nova compute on Hyper-V in the simplest possible way, using a nice and tidy GUI for the occasional deployment or an automated and unattended mode for deployments on a massive number of servers. The result is the installer that I’m going to present in this post, I have to admit that we are quite proud of it :-)

To begin, all you need is an installation of the Microsoft free Hyper-V Server 2008 R2 or 2012 or as an alternative Windows Server 2008 R2 or 2012 with the Hyper-V role enabled.

We suggest to use the free Hyper-V Server edition instead of Windows Server for a few reasons:

  1. It’s free :-)
  2. It runs a very limited subset of the Windows Server operating system, which means that it has a lower impact on security updates and management
  3. There’s no difference in features or performance compared to the full Windows Server

If you want to see how Hyper-V works with OpenStack but you don’t have a server or PC on which to install it, well you can even run it on top of another hypervisor (for test purposes only, this is of course TOTALLY unsupported). As an example you can run it in a VM on top of VMWare Workstation 9, Fusion 5 or ESXi 5.

Hyper-V Nova Compute Installer

We are going to install on Hyper-V only the OpenStack Compute role, so you’ll need to run the other required roles on separate hosts or VMs. If you don’t plan to deploy it in a production environment, I suggest you to create an Ubuntu Server 12.04 VM in Hyper-V or elsewhere with a DevStack deployment.

Once your Hyper-V setup is done, you can copy our installer on a folder on the server and run it.
On Hyper-V / Windows Server 2012, you can even download and run it directly from a Powershell prompt:

$src = ‘http://www.cloudbase.it/downloads/HyperVNovaCompute_Folsom.msi’
$dest = “$env:temp\HyperVNovaCompute_Folsom.msi”
Invoke-WebRequest -uri $src -OutFile $dest
Unblock-File $dest
Start-Process $dest

Here’s how the welcome screen look like:

After accepting the license agreement the features selection will appear:

OpenStack Nova Compute

This is the core feature of the package. It installs a dedicated Python environment, all required dependencies and a Windows service called nova-compute. By clicking on “Browse” it is possible to change the installation folder.

Live Migration

Available on 2012 but not in 2008 R2, requires the host to be a member of a domain (can be even a Samba domain). This feature enables and configures Hyper-V “shared nothing” live migration. Beside KVM, Hyper-V is the only OpenStack hypervisor supporting it, with the additional advantage that thanks to this installer it’s unbelievably easy to setup!

iSCSI Initiator Service

Enables and starts the Microsoft iSCSI initiator service, required for Cinder volume management.

OpenStack Command Prompt

Creates  an OpenStack command prompt shortcut. This is especially useful on Windows Server or on a workstation in order to have a ready made environment with the PATH and other environment variables properly set.

FreeRDP for Hyper-V

FreeRDP is an amazing cross platform open source RDP client that works also with the Hyper-V RDP extensions required to connect to VM consoles. I blogged here in detail about it.

The next steps are required to handle the service configurations and are displayed in function of the selected features.

Nova compute requires one bridge (virtual switch in Hyper-V terms), which can be automatically created by the installer.

The basic configuration consists in providing the settings for the glance server address, RabbitMQ server address, Nova database and the path where the Nova compute driver will save the Hyper-V instances and Glance images.

“Limit CPU features” is required when live migration is used between servers with different CPU architectures.
When “Use CoW Images” is enabled, the Nova compute driver creates differencing disks based on the glance VHD images, instead of copying the entire image for each spawned instance. This leads to massively shorter instance deployment times.

Here’s one of my favorite parts. Live migration can be configured here without having to use Microsoft Hyper-V Manager or Powershell. All you have to do is to choose the authentication type (we suggest Kerberos), the maximum number of parallel live migrations, and IP limitations if needed. Please note also that live migration requires that the Nova Compute service runs with domain credentials. The selected domain user will be automatically added to the local administrators group.

Now lean back, relax, and wait for the installer to do his job :-)
During this step files get copied, services and components get registered, the nova.conf file is written and finally the nova-compute service is started

Once the setup is finished, you can always start it again to change / add / remove any feature.

FAQ

here’s also a quick FAQ for activities that you might need to perform on the Hyper-V server.

How do I restart the compute service?

net stop nova-compute && net start nova-compute

How do I restart the iSCSI initiator service service?

net stop msiscsi && net start msiscsi

How do I perform an unattended setup

You can find here all the supported properties and a full example.

How do I log the installer activity?

msiexec /i HyperVNovaCompute_Folsom.msi /l*v log.txt

How do I uninstall this package if I don’t have the MSI file?

msiexec /uninstall {792BADAA-8FE0-473C-BAD7-CAFA2AFF4F2D}

The post Installing OpenStack Nova Compute on Hyper-V appeared first on Cloudbase Solutions.

Filtering Glance images for Hyper-V

$
0
0

In a number of scenarios it’s very useful to have different hypervisors in your OpenStack infrastructure, for example you might have KVM or XEN for Linux images and Hyper-V for Windows images.

How can you tell Nova Scheduler to associate a given Glance image to a specific hypervisor?

The answer is provided by a filter called ImagePropertiesFilter, enabled by default in Nova Scheduler. This filter looks for a Glance image property called “hypervisor_type” which must contain a value matching with the desired hypervisor type as the name implies. Images without this property set will simply be booted on any available hypervisor, unless other filter will influence the scheduler’s behaviour.

Here’s how to add an image which will boot only on Hyper-V Nova Compute hosts:

glance image-create --property hypervisor_type=hyperv --name "Ubuntu Server 12.04" 
--container-format bare --disk-format vhd < UbuntuServer1204.vhd

Changing the property on an existing image is also very simple:

glance image-update --property hypervisor_type=hyperv <IMAGE_ID>

This feature is supported in the current Hyper-V Grizzly code, already included in our daily updated beta installer.

It can also be easily backported to Folsom, all you need to do is to copy the content of the “nova/virt/hyperv/” folder available in the source repository on github to the corresponding folder in your Hyper-V Nova Compute node.


The post Filtering Glance images for Hyper-V appeared first on Cloudbase Solutions.

How to solve DevStack error “Exception Value: /usr/bin/env: node: No such file or directory”

$
0
0

After installing DevStack on your Ubuntu machine, when trying to access the OpenStack Dashboard (Horizon) you might get the following error:

Exception Value: /usr/bin/env: node: No such file or directory

Here’s the solution, tested on 12.04 and 12.10:

sudo apt-get install node-less
mkdir -p /opt/stack/horizon/bin/less
ln -s /usr/bin/lessc /opt/stack/horizon/bin/less/lessc 

On Ubuntu 12.10 you will also need nodejs-legacy:

apt-get install nodejs-legacy

The post How to solve DevStack error “Exception Value: /usr/bin/env: node: No such file or directory” appeared first on Cloudbase Solutions.

DevStack on Hyper-V

$
0
0

DevStack is without any doubt one of the easiest ways to set up an OpenStack environment for testing or development purposes (no production!!).
It’s also a great way to test the Hyper-V Nova Compute and Quantum Grizzly beta versions that we are releasing these days! :-)

Hyper-V Server 2012 is free and can be downloaded from here . The installation is very simple and straightforward as with any Windows Server solution. You can use of course also the full Windows Server 2012 , but unless you are really missing the GUI features, there’s no need for it.

Another great option for development consists in enabling the Hyper-V role on Windows 8 (Pro or Enterprise). If you have a Mac, Linux or Windows 7 you can run both Hyper-V and DevStack virtualized on VMWare Fusion 5 / Workstation 9.

To make things even easier, in this guide we’ll run DevStack in a VM on top of the Hyper-V compute node. Hyper-V is not particularly picky about hardware, which means that there’s no need for expensive servers to be used for test and development.

The DevStack VM

Let’s start by downloading an Ubuntu Server 12.04 ISO image and create a VM on Hyper-V. Since Hyper-V Server does not provide a GUI, you can do that from a separate host (Windows 8 / Windows Server 2012) or you can issue some simple Powershell commands.
Here’s how to download the Ubuntu ISO image via Powershell:


$isourl = "http://releases.ubuntu.com/12.04/ubuntu-12.04.1-server-amd64.iso"
$isopath = "C:\ISO\ubuntu-12.04.1-server-amd64.iso"
Invoke-WebRequest -uri $isourl -OutFile $isopath


You will need an external virtual switch, in order for the VMs to communicate with the external world (including Internet for our DevStack VM). You can of course skip this step if you already created one.


$net = Get-NetAdapter
$vmswitch = new-vmswitch External -NetAdapterName $net[0].Name -AllowManagementOS $True


Finally here’s how to create and start the DevStack VM, with 1 GB RAM and 15 GB HDD, a virtual network adapter attached to the external switch and the Ubuntu ISO attached to the DVD for the installation.


$vm = new-VM "DevStack" -MemoryStartupBytes (1024*1024*1024) -NewVHDPath "C:\VHD\DevStack.vhdx" -NewVHDSizeBytes (15*1024*1024*1024)
Set-VMDvdDrive $vm.Name -Path $isopath
Connect-VMNetworkAdapter $vm.Name -SwitchName $vmswitch.Name
Start-VM $vm


Now it’s time to connect to the VM console and install Ubuntu. All we need is a basic installation with SSH. DevStack will take care of the rest.


Console access

The free Hyper-V Server does not provide a console UI application, so we have two options:

  1. Access the server from another host using Hyper-V Manager on Windows 8 or Windows Server 2012
  2. Using our free FreeRDP based solution directly from the Hyper-V server

We’ll choose the latter in this guide as we simply love it. :-)

In Powershell from the directory in which you unzipped FreerDP run:


Set-ExecutionPolicy RemoteSigned
Import-Module .\PSFreeRDP.ps1


And now we can finally access the console of our new VM:


Get-VMConsole DevStack


Once you are done with the Ubuntu setup, we can go on and deploy DevStack. My suggestion is to connect to the Ubuntu VM via SSH, as it’s way easier especially for pasting commands. In case you should need an SSH client for Windows, Putty is a great (and free) option.
Let’s  start by adding an NTP daemon as time synchronization issues are a typical source of headaches in OpenStack:


sudo apt-get install ntp
sudo service ntp start


We need Git to download DevStack:

sudo apt-get install git


Installing and running DevStack is easy:


git clone git://github.com/openstack-dev/devstack.git
cd devstack
./stack.sh


The script will ask you for a few passwords. You will find them in the “devstack/localrc” file afterwards.
In case you should prefer to run a specific version of the OpenStack components instead of the latest Grizzly bits, just add the branch name to the git clone command, e.g.:


git clone git://github.com/openstack-dev/devstack.git -b stable/folsom


Now edit your ~/.bashrc file and add the following lines at the end, in order to have your environment ready whenever you log in:


export OS_TENANT_NAME=admin
export OS_USERNAME=admin
export OS_PASSWORD=yourpassword
export OS_AUTH_URL="http://localhost:5000/v2.0/"


And reload it with:

source ~/.bashrc


It’s time to add an image to Glance in order to spawn VMs on Hyper-V. To save you some time we prepared a ready made Ubuntu VM image. When you create your own, remember to use the VHD format and not VHDX.


wget http://www.cloudbase.it/downloads/UbuntuServer1204_cloudinit.zip
unzip UbuntuServer1204_cloudinit.zip
glance image-create --name "Ubuntu Server 12.04" --property hypervisor_type=hyperv --container-format bare --disk-format vhd < UbuntuServer1204.vhd


Note the hypervisor_type property. By specifying it, we are asking Nova Scheduler to use this image on Hyper-V compute nodes only, which means that you can have a mix of KVM, Xen or Hyper-V nodes in your stack, letting Nova Scheduler taking care of it any time you boot a new image, a great feature IMO!
We are almost done. Let’s create a new keypair and save the private key in your user’s home:


test -d ~/.ssh || mkdir ~/.ssh
nova keypair-add key1 >> ~/.ssh/id_rsa
chmod 600 ~/.ssh/id_rsa


Ok, we are done with DevStack so far. We need to setup our Hyper-V Nova Compute node, which is even easier thanks to the installer that we released :-) . Let’s go back to the Powershell:


$src = "http://www.cloudbase.it/downloads/HyperVNovaCompute_Beta.msi"
$dest = "$env:temp\HyperVNovaCompute_Folsom.msi"
Invoke-WebRequest -uri $src -OutFile $dest
Unblock-File $dest
Start-Process $dest


The installation is very easy, just follow the steps available here!
Remember to specify the IP address of your DevStack VM for Glance and RabbitMQ. As Nova database connection string you can simply use: mysql://root:YourDevStackPassword@YourDevstackIP/nova

(Note: never use “root” in a production environment!)

Now let’s go back to DevStack and check that all the services are up and running:


nova-manage service list


You should see a smile “:-)” close to each service and no “XXX”.

Now it’s time to boot our first OpenStack VM:


nova boot --flavor 1 --image "Ubuntu Server 12.04" --key-name key1 vm1


You can check the progress and status of your VM with:


nova list


The first time that you boot an instance it will take a few minutes, depending on the size of your Glance image, as the image itself gets cached on the compute node. Subsequent image boots will be very fast.


Some useful tips

How to delete all the VM at once from the command line

During testing you’ll need to cleanup all the instances quite often. Here’s a simple script to do that on Linux without issuing single “nova delete” commands for every instance:


nova list | awk '{if (NR > 3 && $2 != "") {system("nova delete " $2);}}'


How to update DevStack

I typically run the following script from the DevStack folder after a reboot to update the OpenStack components (Nova, Glance, etc) and the DevStack scripts, just before running stack.sh

git pull
pushd .
cd /opt/stack/nova
git pull
cd /opt/stack/glance
git pull
cd /opt/stack/cinder
git pull
cd /opt/stack/keystone
git pull
cd /opt/stack/horizon
git pull
cd /opt/stack/python-glanceclient
git pull
python setup.py build
sudo python setup.py install --force 
cd /opt/stack/python-novaclient
git pull
python setup.py build
sudo python setup.py install --force
cd /opt/stack/python-cinderclient
git pull
python setup.py build
sudo python setup.py install --force
cd /opt/stack/python-keystoneclient
git pull
python setup.py build
sudo python setup.py install --force
popd


How to check your OpenStack versions

All the components in your stack need to share the same OpenStack version. Don’t mix Grizzly and Folsom components!! Here’s how to check what Nova version you are running:


python -c "from nova import version; print version.NOVA_VERSION"


For Grizzly you will get: ['2013, '1', '0']  (the last number might also be “None”).


The post DevStack on Hyper-V appeared first on Cloudbase Solutions.

Cloud-Init for Windows instances

$
0
0

The automated initialization of a new instance is a task that needs to be split between the cloud infrastructure and the guest OS. OpenStack provides the required metadata via HTTP or via ConfigDrive and cloud-init takes care of configuring the instance on Linux… but what happens on Windows guests?

Well, until recently there were very limited options, but the great news is that we just released cloudbase-init, an open source project that brings the features that are handled by cloud-init on Linux to Windows (and soon FreeBSD as well)!

Some quick facts about it:

  • Supports HTTP and ConfigDriveV2 metadata sources
  • Provides out the box: user creation, password injection, static networking configuration, hostname, SSH public keys and userdata scripts (Powershell, Cmd or Bash)
  • It’s highly modular and can be easily extended to provide support for a lot of features and metadata sources.
  • Works on any hypervisor (Hyper-V, KVM, Xen, etc)
  • Works on Windows Server 2003 / 2003 R2 / 2008 / 2008 R2 / 2012 and Windows 7 and 8.
  • It’s platform independent, meaning that we plan to add other OSs, e.g.: FreeBSD
  • Written in Python
  • Open source, Apache 2 licensed


To simplify things even more, here’s a free installer :-)


The installer takes care of everything, including installing a dedicated Python environment, generating a configuration file and creating a Windows service that runs at boot time. Configuration settings like the username, group membership and the network adapter to be configured can be specified during setup or later by editing the configuration file (cloudbase-init.conf).


After the setup finishes, you’ll find a new service called “Cloud Initialization Service”. The service is not started yet, it wil start automatically at the next boot. All you have to do now is shutting down your VM and upload the image to Glance.


When the service runs for the first time at boot, it will look for a metadata data source by checking the available ones in the order provided in the cloudbase-init.conf file. By default it looks for the ConfigDrive and then for the classic HTTP Url on 169.254.169.254 (IP address configurable in the conf file).

After retrieving the metadata, the service executes a list of plugins:


cloudbaseinit.plugins.windows.sethostname.SetHostNamePlugin

Sets the instance’s hostname. It triggers an automatic reboot to apply it.


cloudbaseinit.plugins.windows.createuser.CreateUserPlugin

Creates / updates a local user, setting the password provided in the metadata (admin_pass). The user is then added to a set of local groups. The following configuration parameters control the behaviour of this plugin:

  • username: default: Admin
  • groups: Comma separated list of groups. Default: Administrators
  • inject_user_password: Can be set to false to avoid the injection of the password provided in the metadata. Default: True


cloudbaseinit.plugins.windows.networkconfig.NetworkConfigPlugin

Configures static networking.

  • network_adapter: Network adapter to configure. If not specified, the first available ethernet adapter will be chosen. Default: None


cloudbaseinit.plugins.windows.sshpublickeys.SetUserSSHPublicKeysPlugin

Creates an “authorized_keys” file in the user’s home directory containing the SSH keys provided in the metadata. Note: on Windows a SSH service needs to be installed to take advantage of this feature.


cloudbaseinit.plugins.windows.userdata.UserDataPlugin

Executes custom scripts provided with the user_data metadata (plain text or compressed with gzip).

Supported formats:

Windows batch

The file is executed in a cmd.exe shell (can be changed with the COMSPEC environment variable). The user_data first line must be: rem cmd

Powershell

Scripting is automatically enabled if not set (RemoteSigned). The user_data first line must be: #ps1

Bash

A bash shell needs to be installed in the system and available in the PATH in order to use this feature. The user_data first line must start with: #!


When the configuration is done, the service saves a value in the Windows registry to avoid the execution of the same plugins on the next boot. In order to trigger again the execution of the configuration scripts, just remove the following Registry key and restart the service or reboot:

HKEY_LOCAL_MACHINE\Software\Cloudbase Solutions\Cloudbase-Init

Note: on 64 bit versions of Windows, the key is:

HKEY_LOCAL_MACHINE\Software\Wow6432Node\Cloudbase Solutions\Cloudbase-Init


Unattended setup

The setup can be done in silent mode as well, which means that it can be easily integrated in a Puppet, Chef or Windows GPO deployment strategy.

Here’s the basic syntax, with an additional optional log file to verify that everything worked fine:

msiexec /i CloudbaseInitSetup.msi /qn /l*v log.txt


You can also pass parameters, for example to specify the ethernet adapter to be configured:

msiexec /i CloudbaseInitSetup.msi /qn /l*v log.txt NETWORKADAPTERNAME="Intel(R) PRO/1000 MT Network Connection"


The post Cloud-Init for Windows instances appeared first on Cloudbase Solutions.

Cinder-Volume on Windows Storage Server 2012

$
0
0

Windows Server 2012 and Windows Storage Server 2012 offer an integrated iSCSI Target service that can be used with Cinder Volume in your stack. Being entirely a software solution, consider it in particular for mid sized networks where the costs of a SAN might be excessive.

One of the great advantages of integrating Windows solutions in the OpenStack ecosystem is the ease of management and deployment. Cinder is no exception as you will see right away.

All you need to start is a physical or virtual host running Windows Server 2012 or Windows Storage Server 2012 and a copy of our Cinder volume installer available for free here.

Here’s our welcome screen:


Once you get through the license and the folder selection screens, you will be asked for the cinder.conf options as in the following screenshot. The great advantage is that the installer will create all the configuration files for you, without having to look around for obscure options by yourself :-)


The Windows iSCSI LUNs path is the folder where the Microsoft iSCSI Target Service will create a VHD for each volume, so it is best to choose an appropriate data partition if available.

The next step consist in providing the optional logging options:

That’s it! One last confirmation screen and the setup will start. Another great advantage of this setup is that it will take care of all the dependencies, including Python, the iSCSI Target Service, the cinder-volume Windows service and so on.


Once the setup is finished, the cinder-volume service will start and you can check the logs (in the path configured above) to see if the service is properly connected to your controller.

You can restart the service from the Windows Service GUI tool or via command line with:

net stop cinder-volume
net start cinder-volume

To test your new volume server, you can connect to your OpenStack controller and create a simple volume:

cinder create 1

This command creates a 1GB volume. You can now check the status of your new volume:

cinder list

The Windows Cinder Volume driver works perfectly well with Nova on any Hypervisor, including support for the boot from volume feature. Great kudos go to Pedro Navarro Pérez who contributed the Windows volume driver to the Cinder project!


The post Cinder-Volume on Windows Storage Server 2012 appeared first on Cloudbase Solutions.


FreeRDP for Windows – Nightly builds

$
0
0

As part of our work with FreeRDP, we need to frequently build the Windows client based on the latest available code and since we already provide freely available automated nightly builds for our products, why not providing FreeRDP as well?

Download the portable WFreeRDP binaries (nightly build) 

Updated daily at midnight GMT.


The above link provides a portable archive with no need for the Microsoft redistributable runtime and already packaged with the OpenSSL DLLs. You can unzip it and run it on any Windows OS starting from Windows XP SP2, without additional requirements.

If you simply need to download a compiled copy of FreeRDP, you can already stop reading. The following paragraphs provide some details about the compilation process.

Code repository:

https://github.com/FreeRDP/FreeRDP.git

CMake version:

Version: 2.8.10

CMake command line:

cmake . -DMONOLITHIC_BUILD=ON -DBUILD_SHARED_LIBS=OFF -G “Visual Studio 11″

Compiler: 

Visual Studio 2012 Update 2

Visual Studio Toolset:

v110_xp (For compatibility with Xp / 2003)

Configuration:

Release

Runtime Library:

MultiThreaded (statically linked)


The post FreeRDP for Windows – Nightly builds appeared first on Cloudbase Solutions.

Multi-node OpenStack RDO on RHEL and Hyper-V – Part 1

$
0
0

We are getting a lot of requests about how to deploy OpenStack in proof of concept (PoC) or production environments as, let’s face it, setting up an OpenStack infrastructure from scratch without the aid of a deployment tool is not particularly suitable for faint at heart newcomers :-)

DevStack, a tool that targets development environments, is still very popular for building proof of concepts as well, although the results can be quite different from deploying a stable release version. Here’s an alternative that provides a very easy way to get OpenStack up and running, using the latest OpenStack stable release.


RDO and Packstack

RDO is an excellent solution to go from zero to a fully working OpenStack deployment in a matter of minutes.

  • RDO is simply a distribution of OpenStack for Red Hat Enterprise Linux (RHEL), Fedora and derivatives (e.g.: CentOS).
  • Packstack is a Puppet based tool that simplifies the deployment of RDO.

There’s quite a lot of documentation about RDO and Packstack, but mostly related to so called all-in-one setups (one single server), which are IMO too trivial to be considered for anything beyond the most basic PoC, let alone a production environment. Most real OpenStack deployments are multi-node, which is quite natural given the highly distributed nature of OpenStack.

Some people might argue that the reason for limiting the efforts to all-in-one setups is reasonably mandated by the available hardware resources. Before taking a decision in that direction, consider that you can run the scenarios described in this post entirely on VMs. For example, I’m currently employing VMWare Fusion virtual machines on a laptop, nested hypervisors (KVM and Hyper-V) included. This is quite a flexible scenario as you can simulate as many hosts and networks as you need without the constraints that a physical environment has.

Let’s start with describing how the OpenStack Grizzly multi-node setup that we are going to deploy looks like.


Controller

This is the OpenStack “brain”, running all Nova services except nova-compute and nova-network, plus quantum-server, Keystone, Glance, Cinder and Horizon (you can add also Swift and Ceilometer).
I typically assign 1GB of RAM to this host and 30GB of disk space (add more if you want to use large Cinder LVM volumes or big Glance images). On the networking side, only a single nic (eth0) connected to the management network is needed (more on networking soon).


Network Router

The job of this server is to run OpenVSwitch to allow networking among your virtual machines and the Internet (or any other external network that you might define).
Beside OpenVSwitch this node will run quantum-openvswitch-agent, quantum-dhcp-agent, quantum-l3-agent and quantum-metadata-proxy.
1 GB of RAM and 10GB of disk space are enough here. You’ll need three nics, connected to the management (eth0), guest data (eth1) and public (eth2) networks.
Note: If you run this node as a virtual machine, make sure that the hypervisor’s virtual switches support promiscuous mode.


KVM compute node (optional)

This is one of the two hypervisors that we’ll use in our demo. Most people like to use KVM in OpenStack, so we are going to use it to run our Linux VMs.
The only OpenStack services required here are nova-compute and quantum-openvswitch-agent.
Allocate the RAM and disk resources for this node based on your requirements, considering especially the amount of RAM and disk space that you want to assign to your VMs. 4GB of RAM and 50GB of disk space can be considered as a starting point. If you plan to run this host in a VM, make sure that the virtual CPU supports nested virtualization. Two nics required, connected to the management (eth0) and guest data (eth1) networks.


Hyper-V 2012 compute node (optional)

Micrsosoft Hyper-V Server 2012 is a great and completely free hypervisor, just grab a copy of the ISO from here. In the demo we are going to use it for running Windows instances, but beside that you can of course use it to run Linux or FreeBSD VMs as well. You can also grab a ready made OpenStack Windows Server 2012 Evaluation image from here, no need to learn how to package a Windows OpenStack image today. Required OpenStack services here are nova-compute and quantum-hyperv-agent. No worries, here’s an installer that will take care of setting them up for you, make sure to download the stable Grizzly release.
Talking about resources to allocate for this host, the same consideration discussed for the KVM node apply here as well, just consider that Hyper-V will require 16GB-20GB of disk space for the OS itself, including updates. I usually assign 4GB of RAM and 60-80GB of disk. Two nics required here as well, connected to the management and guest data networks.


OpenStack_multi_node_network

Networking

Let’s spend a few words about how the hosts are connected.


Management

This network is used for management only (e.g. running nova commands or ssh into the hosts). It should definitely not be accessible from the OpenStack instances to avoid any security issue.


Guest data

This is the network used by guests to communicate among each other and with the rest of the world. It’s important to note that although we are defining a single physical network, we’ll be able to define multiple isolated networks using VLANs or tunnelling on top of it. One of the requirements of our scenario is to be able to run groups of isolated instances for different tenants.


Public

Last, this is the network used by the instances to access external networks (e.g. the Internet) routed through the network host. External hosts (e.g. a client on the Internet) will be able to connect to some of your instances based on the floating ip and security descriptors configuration.


Hosts configuration

Just do a minimal installation and configure your network adapters. We are using CentOS 6.4 x64, but RHEL 6.4, Fedora or Scientific Linux images are perfectly fine as well. Packstack will take care of getting all the requirements as we will soon see.

Once you are done with the installation, updating the hosts with yum update -y is a good practice.

Configure your management adapters (eth0) with a static IP, e.g. by editing directly the ifcfg-eth0 configuration file in /etc/sysconfig/network-scripts. As a basic example:


DEVICE="eth0"
ONBOOT="yes"
BOOTPROTO="static"
MTU="1500"
IPADDR="10.10.10.1"
NETMASK="255.255.255.0"


General networking configuration goes in /etc/sysconfig/network, e.g.:


GATEWAY=10.10.10.254
NETWORKING=yes
HOSTNAME=openstack-controller


And add your DNS configuration in /etc/resolv.conf, e.g.:


nameserver 208.67.222.222
nameserver 208.67.220.220


Nics connected to guest data (eth1) and public (eth2) networks don’t require an IP. You also don’t need to add any OpenVSwitch configuration here, just make sure that the adapters get enabled on boot, e.g.:


DEVICE="eth1"
BOOTPROTO="none"
MTU="1500"
ONBOOT="yes"


You can reload your network configuration with:


service network restart


Packstack

Once you have setup all your hosts, it’s time to install Packstack. Log in on the controller host console and run:


sudo yum install -y http://rdo.fedorapeople.org/openstack/openstack-grizzly/rdo-release-grizzly.rpm
sudo yum install -y openstack-packstack
yum install -y openstack-utils


Now we need to create a so called “answer file” to tell Packstack how we want our OpenStack deployment to be configured:


packstack --gen-answer-file=packstack_answers.conf


One useful point about the answer file is that it is already populated with random passwords for all your services, change them as required.

Here’s a script add our configuration to the answers file. Change the IP address of the network and KVM compute hosts along with any of the Cinder or Quantum parameters to fit your scenario.


ANSWERS_FILE=packstack_answers.conf
NETWORK_HOST=10.10.10.2
KVM_COMPUTE_HOST=10.10.10.3
openstack-config --set $ANSWERS_FILE general CONFIG_SSH_KEY /root/.ssh/id_rsa.pub
openstack-config --set $ANSWERS_FILE general CONFIG_NTP_SERVERS 0.pool.ntp.org,1.pool.ntp.org,2.pool.ntp.org,3.pool.ntp.org
openstack-config --set $ANSWERS_FILE general CONFIG_CINDER_VOLUMES_SIZE 20G
openstack-config --set $ANSWERS_FILE general CONFIG_NOVA_COMPUTE_HOSTS $KVM_COMPUTE_HOST
openstack-config --del $ANSWERS_FILE general CONFIG_NOVA_NETWORK_HOST
openstack-config --set $ANSWERS_FILE general CONFIG_QUANTUM_L3_HOSTS $NETWORK_HOST
openstack-config --set $ANSWERS_FILE general CONFIG_QUANTUM_DHCP_HOSTS $NETWORK_HOST
openstack-config --set $ANSWERS_FILE general CONFIG_QUANTUM_METADATA_HOSTS $NETWORK_HOST
openstack-config --set $ANSWERS_FILE general CONFIG_QUANTUM_OVS_TENANT_NETWORK_TYPE vlan
openstack-config --set $ANSWERS_FILE general CONFIG_QUANTUM_OVS_VLAN_RANGES physnet1:1000:2000
openstack-config --set $ANSWERS_FILE general CONFIG_QUANTUM_OVS_BRIDGE_MAPPINGS physnet1:br-eth1
openstack-config --set $ANSWERS_FILE general CONFIG_QUANTUM_OVS_BRIDGE_IFACES br-eth1:eth1


Now, all we have to do is running Packstack and just wait for the configuration to be applied, including dependencies like MySQL Server and Apache Qpid (used by RDO as an alternative to RabbitMQ). You’ll have to provide the password to access the other nodes only once, afterwards Packstack will deploy an SSH key to the remote ~/.ssh/authorized_keys files. As anticipated Puppet is used to perform the actual deployment.


packstack --answer-file=packstack_answers.conf


At the end of the execution, Packstack will ask you to install a new Linux kernel on the hosts provided as part of RDO repository. This is needed because the kernel provided by RHEL (and thus CentOS) doesn’t support network namespaces, a feature needed by Quantum in this scenario. What Packstack doesn’t tell you is that the 2.6.32 kernel they provide will create a lot more issues with Quantum. At this point why not installing a modern 3.x kernel? :-)

My suggestion is to skip altogether the RDO kernel and install the 3.4 kernel provided as part of the CentOS Xen project (which does not mean that we are installing Xen, we only need the kernel package).

Let’s update the kernel and reboot the network and KVM compute hosts from the controller (no need to install it on the controller itsef):


for HOST in $NETWORK_HOST $KVM_COMPUTE_HOST
do
    ssh -o StrictHostKeychecking=no $HOST "yum install -y centos-release-xen && yum update -y --disablerepo=* --enablerepo=Xen4CentOS kernel && reboot"
done


At the time of writing, there’s a bug in Packstack that applies to multi-node scenarios where the Quantum firewall driver is not set in quantum.conf, causing failures in Nova. Here’s a simple fix to be executed on the controller (the alternative would be to disable the security groups feature altogether):


sed -i 's/^#\ firewall_driver/firewall_driver/g' /etc/quantum/plugins/openvswitch/ovs_quantum_plugin.ini
service quantum-server restart


We can now check if everything is working. First we need to set our environment variables:


source ./keystonerc_admin
export EDITOR=vim


Let’s check the nova services:


nova-manage service list


Here’s a sample output. If you see xxx in place of one of the smily faces it means that there’s something to fix :-)


Binary           Host                                 Zone             Status     State Updated_At
nova-conductor   os-controller.cbs                    internal         enabled    :- )  2013-07-14 19:08:17
nova-cert        os-controller.cbs                    internal         enabled    :- )  2013-07-14 19:08:19
nova-scheduler   os-controller.cbs                    internal         enabled    :- )  2013-07-14 19:08:17
nova-consoleauth os-controller.cbs                    internal         enabled    :- )  2013-07-14 19:08:19
nova-compute     os-compute.cbs                       nova             enabled    :- )  2013-07-14 18:42:00


Now we can check the status of our Quantum agents on the network and KVM compute hosts:


quantum agent-list


You should get an output similar to the following one.


+--------------------------------------+--------------------+----------------+-------+----------------+
| id                                   | agent_type         | host           | alive | admin_state_up |
+--------------------------------------+--------------------+----------------+-------+----------------+
| 5dff6900-4f6b-4f42-b7f1-f2842439bc4a | DHCP agent         | os-network.cbs | :- )  | True           |
| 666a876f-6005-466b-9822-c31d48a5c9a8 | L3 agent           | os-network.cbs | :- )  | True           |
| 8c190fc5-990f-494f-85c0-f3964639274b | Open vSwitch agent | os-compute.cbs | :- )  | True           |
| cf62892e-062a-460d-ab67-4440a790715d | Open vSwitch agent | os-network.cbs | :- )  | True           |
+--------------------------------------+--------------------+----------------+-------+----------------+


OpenVSwitch

On the network node we need to add the eth2 interface to the br-ex bridge:


ovs-vsctl add-port br-ex eth2


We can now check if the OpenVSwitch configuration has been applied correctly on the network and KVM compute nodes. Log in on the network node and run:


ovs-vsctl show


The output should look similar to:


f99276eb-4553-40d9-8bb0-bf3ac6e885e8
    Bridge br-int
        Port br-int
            Interface br-int
                type: internal
        Port "int-br-eth1"
            Interface "int-br-eth1"
    Bridge "br-eth1"
        Port "eth1"
            Interface "eth1"
        Port "br-eth1"
            Interface "br-eth1"
                type: internal
        Port "phy-br-eth1"
            Interface "phy-br-eth1"
    Bridge br-ex
        Port br-ex
            Interface br-ex
                type: internal
        Port "eth2"
            Interface "eth2"
    ovs_version: "1.10.0"


Notice the membership of eth1 to br-eth1 and eth2 to br-ex. If you don’t see them, we can just add them now.

To add a bridge, should br-eth1 be missing:


ovs-vsctl add-br br-eth1


To add the eth1 port to the bridge:


ovs-vsctl add-port br-eth1 eth1


You can now repeat the same procedure on the KVM compute node, considering only br-eth1 and eth1 (there’s no eth2).


What’s next?

Ok, enough for today. In the forthcoming Part 2 we’ll see how to add a Hyper-V compute node to the mix!

The post Multi-node OpenStack RDO on RHEL and Hyper-V – Part 1 appeared first on Cloudbase Solutions.

OpenStack Windows Server 2012 R2 Evaluation

$
0
0

Our official OpenStack Windows Server evaluation images got updated to the freshly released 2012 R2 version just in time for the Hong Kong summit!

Full support for OpenStack Havana is included for KVM and Hyper-V. We plan to release images for additional hypervisors as well quite soon (XenServer / XCP and ESXi / vSphere).

The images include the latest version of Cloudbase-Init, with new features and a fix for an issue that prevented to retrieve, in some circumstances, the Admin user’s password in the previous Grizzly 2012 image.


ws2012_r2_eval_cbs


How to deploy the images in OpenStack

The first thing consists in downloading an image and uploading it in Glance.

For KVM:

gunzip -cd  windows_server_2012_r2_standard_eval_kvm_20131031.vhd.gz | \
glance image-create --property hypervisor_type=qemu --name "Windows Server 2012 R2 Std Eval" \
--container-format bare --disk-format qcow2

 
For Hyper-V:

gunzip -cd  windows_server_2012_r2_standard_eval_hyperv_20131031.vhd.gz | \
glance image-create --property hypervisor_type=hyperv --name "Windows Server 2012 R2 Std Eval" \
--container-format bare --disk-format vhd

 
Now just boot the image as usual, providing a keypair, which is needed to retrieve the password later.

nova boot --flavor 2 --image "Windows Server 2012 Std Eval" --key-name key1 MyWindowsInstance


Once the image has been booted, you can get the Admin user’s password with:

nova get-password MyWindowsInstance /path/to/your/keypairs/private/key

 
Please note that the HTTP metadata service must be available in order for this feature to work. If you see a blank password, most probably the HTTP metadata service was not available when the password was set or the instance has been booted without a keypair assigned.
 

How to access the image via Remore Desktop Protocol (RDP)

First, make sure to add the RDP TCP port (3389) to a security group, for example:

nova secgroup-add-rule default tcp 3389 3389 0.0.0.0/0


Assign a floating IP to your instance and point your RDP client to it. When prompt for credentials, provide “Admin” and the password retrieved at the previous step.

Beside Windows, there are official Microsoft RDP clients available for OS XiOS and Android.

On Linux, FreeRDP is by far the best available choice as it’s based on the official Microsoft open RDP specifications
 

How are those images created?

Here’s a post with a detailed explanation!

The post OpenStack Windows Server 2012 R2 Evaluation appeared first on Cloudbase Solutions.

How to create Windows OpenStack images

$
0
0

We get regularly a lot of requests about how to generate Windows OpenStack images, especially for KVM, where the proper VirtIO drivers need to be installed.

This article provides all the step required to build one, as we did for the official OpenStack Windows Server 2012 R2 Evaluation images

All the scripts are publicly available on Github.

For people familiar with Linux unattended deployment solutions like kickstart or preseed files, Windows has a roughly similar model based on XML files which can be automatically generated with a freely available tool currently called Windows Assessment and Deployment Kit (ADK in short). The ADK is not necessary if you’re fine with tweaking XML files manually as we usually do.

Kickstart and Preseed files in Linux provide a “post” script where you can do some more advanced provisioning by running your own scripts. That’s also what we do here. The difference is that we split the work in 3 specific areas:

  1. SynchronousCommands during the Specialize step. This is the earliest moment in which we can run some custom actions. Scripts will be executed with the SYSTEM credentials and won’t be able to access some OS features that are not yet available, for example WMI. This is the best place where to place your script, especially if you expect a reboot to load your features.
  2. SynchronousCommands during the first logon. These commands get executed when the setup is basically done with the Administrator’s credentials (or whatever is specified in the XML file), just before the user can log in. As a comparison, this is the closest thing to a “post” script in a Kickstart file.
  3. AsysncronousCommands during logon. These commands are executed after the setup and are really useful if you need to execute work that requires an unspecified number of additional reboots. We use it mainly to execute Windows updates.

To make things simpler, during each of the above steps we download and execute a Powershell script from the Github repository instead of adding every single action that we want to run into the XML file. This way we have a lot more flexibility and troubleshooting issues while writing those scripts becomes a cakewalk, especially using virtual machine snapshots.

Here are the actions that are performed in detail:

Specialize

  1. The most important feature: setting the Cloudbase Solutions wallpaper. :-)
  2. Enabling ping response in the firewall (Note: RDP access is enabled in the XML file).
  3. Downloading the FirstLogon script.

FirstLogon

  1. Detecting what platform we are running on (KVM, Hyper-V, ESXi, etc). This requires WMI and is the reason why this and the next step are not executed during the Specialize phase.
  2. Installing the relevant platform drivers and tools: VirtIO drivers on KVM and VMWare tools on ESXi. Nothing is needed on Hyper-V, as the relevant tools are already included starting with Windows Server 2008. Note: the VirtIO drivers are unsigned, so we use a trick to get the job done in a fully unattended way. ;-)
  3. Downloading the logon script.

Logon

  1. Installing PSWindowsUpdate, a Powershell module to handle, well, Windows Updates.
  2. Installing the updates. At the end of each updates round a reboot is performed if needed and after reboot the same step is repeated until the system is up to date. Please note that this might take a while, mostly depending on your Internet connection speed.
  3. Downloading and installing the latest Cloudbase-Init version.
  4. Finally running Sysprep, using Cloudbase-Init’s Unattended.xml and rebooting.

All you have to do to prepare an image, is to start a VM with the Autounattend.xml file on a virtual floppy, the Windows Server ISO connected on the first DVDRom drive and the optional platform tools (VirtIO drivers, VMWare tools, etc) on the second  DVDRom drive.

When the image is done, it will shut down automatically, ready to be put in Glance.

Fairly easy, no?


How to automate the image creation on KVM

IMAGE=windows-server-2012-r2.qcow2
FLOPPY=Autounattend.vfd
VIRTIO_ISO=virtio-win-0.1-65.iso
ISO=9600.16384.WINBLUE_RTM.130821-1623_X64FRE_SERVER_EVAL_EN-US-IRM_SSS_X64FREE_EN-US_DV5.ISO

KVM=/usr/libexec/qemu-kvm
if [ ! -f "$KVM" ]; then
    KVM=/usr/bin/kvm
fi

qemu-img create -f qcow2 -o preallocation=metadata $IMAGE 16G

$KVM -m 2048 -smp 2 -cdrom $ISO -drive file=$VIRTIO_ISO,index=3,media=cdrom -fda $FLOPPY $IMAGE \
-boot d -vga std -k en-us -vnc :1

Note: don’t forget to open the VNC port on the hypervisor’s firewall if you want to check of things are going (5901 in the example). It’s very important not to interact with the OS while the scripts run, but it’s a great way to see how things progress.

How to automate the image creation on Hyper-V

$vmname = "OpenStack WS 2012 R2 Standard Evaluation"

# Set the extension to VHD instead of VHDX only if you plan to deploy
# this image on Grizzly or on Windows / Hyper-V Server 2008 R2
$vhdpath = "C:\VM\windows-server-2012-r2.vhdx"

$isoPath = "C:\your\path\9600.16384.WINBLUE_RTM.130821-1623_X64FRE_SERVER_EVAL_EN-US-IRM_SSS_X64FREE_EN-US_DV5.ISO"
$floppyPath = "C:\your\path\Autounattend.vfd"

# Set the vswitch accordingly with your configuration
$vmSwitch = "external"

New-VHD $vhdpath -Dynamic -SizeBytes (16 * 1024 * 1024 * 1024)
$vm = New-VM $vmname -MemoryStartupBytes (2048 * 1024 *1024)
$vm | Set-VM -ProcessorCount 2
$vm.NetworkAdapters | Connect-VMNetworkAdapter -SwitchName $vmSwitch
$vm | Add-VMHardDiskDrive -ControllerType IDE -Path $vhdpath
$vm | Add-VMDvdDrive -Path $isopath
$vm | Set-VMFloppyDiskDrive -Path $floppyPath

$vm | Start-Vm

Check the README file of the project for updates, we’re definitely going to add more hypervisor options!

The post How to create Windows OpenStack images appeared first on Cloudbase Solutions.

Multi-node OpenStack RDO on RHEL and Hyper-V – Part 2

$
0
0

Here’s our second post in the RDO + Hyper-V series targeting Havana and automation.

We had lots of great feedbacks about the first post, along with many requests about how to troubleshoot network connectivity issues that arise quite often when you configure a complex environment like a multi-node OpenStack deployment, especially for the first time!

Although RDO is a great solution to automate an OpenStack deployment, it still requires quite a few manual steps, especially in a multi-node scenario. Any small configuration error in one of those steps can lead to hours of troubleshooting, so we definitely need an easy foolproof solution.

In this post we’ll detail a “simple” script available here that will perform all the configuration work for you.

Here’s a diagram of what we are going to obtain (click to enlarge):


OpenStack_multi_node_network

Physical network layout

Network connectivity is very important, so let’s recap how the hosts need to be connected.

We’ll use 3 separate networks:

1. Management

This network will be used only for setting up the hosts and for HTTP and AMQP communication among them. It requires Internet access during the initial configuration. Guests must not be able to access this network under any circumstance.

2. Data (guest access)

Network used by the guests to communicate among each other (in the same Neutron network) and with the Network host for external routing.

Since we are going to use VLANs for network isolation in this example, make sure that your switches are properly configured (e.g. trunking mode).

3. External

Used by the Network host to communicate with external networks (e.g. Internet).


Hosts OS configuration

Now, we’ll need to get the hosts running. If you want to create a proof of concept (PoC), virtual machines can be absolutely enough as long as they support nested virtualization, while for a real production environment we suggest to use physical machines for all the nodes except optionally the controller. In this example we’ll use the “root” / “Passw0rd” credentials on all Linux hosts and “Administrator” / “Passw0rd” on Hyper-V.

Controller host

RAM

At least 1GB, 2-8GB or more if you plan to use Ceilometer on this node.

HDD

At least 10GB, recommended at least 100GB if you plan to store the Glance images here.

CPU

1-2 sockets, not particularly relevant in most circumstances.

Network

  • eth0 connected to the Management network.


Network host

RAM

1GB

HDD

10GB or even less, this host has really no particular disk space requirements

CPU

1-2 sockets, not particularly relevant unless you use GRE / VXLAN tunnelling.

Network

  • eth0 connected to the Management network.
  • eth1 connected to the Data network.
  • eth2 adapter connected to the External network.


KVM compute host (optional)

Multiple compute nodes can be added based on your requirements. We’ll use one in our example for the sake of simplicity.

RAM

A minimum of 4GB, Recommended? As much as possible. :-) This really depends on how many VMs you want to run. Sum the amount of memory you want to assign to the guests and add 1 GB for the host. Avoid memory overcommit if possible. 64, 128, 192 GB are quite common choices.

HDD

A minimum of 10GB. This is based on the local storage that you want to assign to the guests, I’d start with at least 100GB.

CPU

2 sockets, as many cores as possible, based on the number of guests. For example 2 esacore sockets with multithreading enabled provide 12 usable CPU threads to assign to the guests.

Network

  • eth0 adapter connected to the Management network.
  • eth1 adapter connected to the Data network.

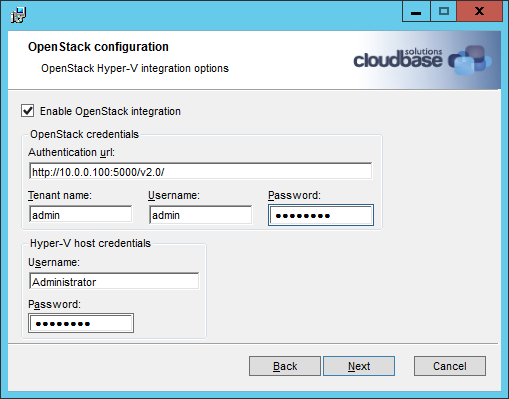
Hyper-V compute host (optional)

The same consideration discussed for the KVM compute node apply to this case as well.

You can just perform a basic installation and at the end enable WinRM by running the following Powershell script that will download OpenSSL, configure a CA, generate a certificate to be used for HTTPS and configure WinRM for HTTPS usage with basic authentication: SetupWinRMAccess.ps1

$filepath = "$ENV:Temp\SetupWinRMAccess.ps1"
(new-object System.Net.WebClient).DownloadFile("https://raw.github.com/cloudbase/openstack-rdo-scripts/master/SetupWinRMAccess.ps1", $filepath)
Set-ExecutionPolicy RemoteSigned -Force
& $filepath
del $filepath


Configure RDO

Now, let’s get the management IPs assigned to the hosts. In our examples we’ll use:

  1. Controller: 192.168.200.1
  2. Network: 192.168.200.2
  3. KVM compute: 192.168.200.3
  4. Hyper-V compute: 192.168.200.4


You can already start the script and let it run while we explain how it works afterwards. It runs on Linux, Mac OS X or Windows (using Bash).

git clone&nbsp;https://github.com/cloudbase/openstack-rdo-scripts
cd&nbsp;openstack-rdo-scripts
ssh-keygen -q -t rsa -f ~/.ssh/id_rsa_rdo -N "" -b 4096
./configure-rdo-multi-node.sh havana ~/.ssh/id_rsa_rdo rdo-controller 192.168.200.1 rdo-network \
192.168.200.2 rdo-kvm 192.168.200.3 rdo-hyperv 192.168.200.4

If you are not deploying Hyper-V, you can simply omit the last two values of course.

Here’s a video showing what to expect (except the initial VM deployment part which is outside of the scope of this post):

The script explained

You can open it directly on Github and follow the next explanations:

1. Inject the SSH key

This is performed for each Linux host to enable the automated configuration steps afterwards.

configure_ssh_pubkey_auth $RDO_ADMIN $CONTROLLER_VM_IP $SSH_KEY_FILE_PUB $RDO_ADMIN_PASSWORD
configure_ssh_pubkey_auth $RDO_ADMIN $NETWORK_VM_IP $SSH_KEY_FILE_PUB $RDO_ADMIN_PASSWORD
configure_ssh_pubkey_auth $RDO_ADMIN $QEMU_COMPUTE_VM_IP $SSH_KEY_FILE_PUB $RDO_ADMIN_PASSWORD

2. Set the host date and time

update_host_date $RDO_ADMIN@$CONTROLLER_VM_IP
update_host_date $RDO_ADMIN@$NETWORK_VM_IP
update_host_date $RDO_ADMIN@$QEMU_COMPUTE_VM_IP

3. Rename the Hyper-V compute host (if present)

exec_with_retry "$BASEDIR/rename-windows-host.sh $HYPERV_COMPUTE_VM_IP $HYPERV_ADMIN \
$HYPERV_PASSWORD $HYPERV_COMPUTE_VM_NAME" 30 30

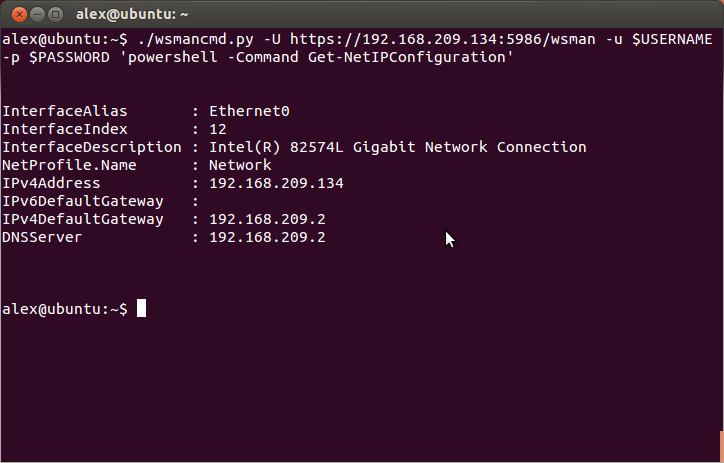
This uses a separate script which in turn is based on WSMan to call Powershell remotely (even from Linux!):

wsmancmd.py -U https://$HOST:5986/wsman -u $USERNAME -p $PASSWORD \
'powershell -NonInteractive -Command "if ([System.Net.Dns]::GetHostName() -ne \"'$NEW_HOST_NAME'\") \
{ Rename-Computer \"'$NEW_HOST_NAME'\" -Restart -Force }"'

4. Configure Linux networking on all nodes

This uses a function called config_openstack_network_adapter to configure the adapter’s ifcfg-ethx file to be used by Open vSwitch.

# Controller
set_hostname $RDO_ADMIN@$CONTROLLER_VM_IP $CONTROLLER_VM_NAME.$DOMAIN $CONTROLLER_VM_IP

# Network
config_openstack_network_adapter $RDO_ADMIN@$NETWORK_VM_IP eth1
config_openstack_network_adapter $RDO_ADMIN@$NETWORK_VM_IP eth2
set_hostname $RDO_ADMIN@$NETWORK_VM_IP $NETWORK_VM_NAME.$DOMAIN $NETWORK_VM_IP

# KVM compute
config_openstack_network_adapter $RDO_ADMIN@$QEMU_COMPUTE_VM_IP eth1
set_hostname $RDO_ADMIN@$QEMU_COMPUTE_VM_IP $QEMU_COMPUTE_VM_NAME.$DOMAIN $QEMU_COMPUTE_VM_IP

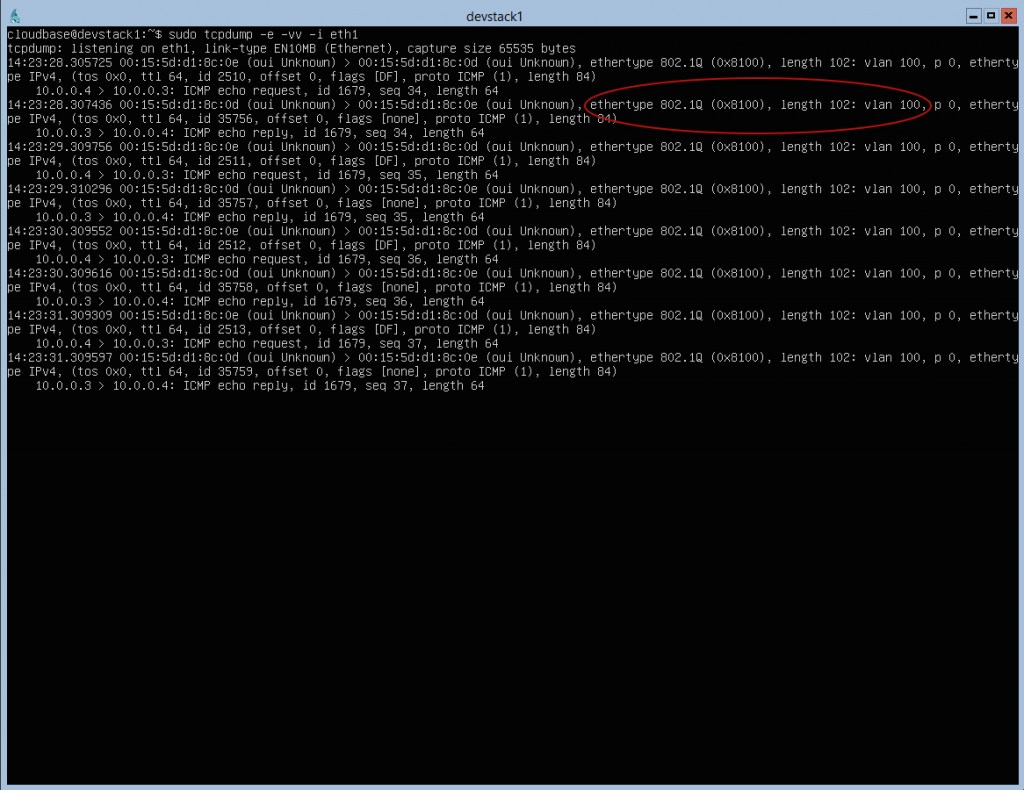
5. Test if networking works

This is a very important step, as it validates the network configuration anticipating potential issues!
Some helper functions are used in this case as well.

set_test_network_config $RDO_ADMIN@$NETWORK_VM_IP $NETWORK_VM_TEST_IP/24 add
set_test_network_config $RDO_ADMIN@$QEMU_COMPUTE_VM_IP $QEMU_COMPUTE_VM_TEST_IP/24 add

ping_ip $RDO_ADMIN@$NETWORK_VM_IP $QEMU_COMPUTE_VM_TEST_IP
ping_ip $RDO_ADMIN@$QEMU_COMPUTE_VM_IP $NETWORK_VM_TEST_IP

6. Install Packstack on the controller

run_ssh_cmd_with_retry $RDO_ADMIN@$CONTROLLER_VM_IP "yum install -y http://rdo.fedorapeople.org/openstack/openstack-$OPENSTACK_RELEASE/rdo-release-$OPENSTACK_RELEASE.rpm || true"
run_ssh_cmd_with_retry $RDO_ADMIN@$CONTROLLER_VM_IP "yum install -y openstack-packstack"

We’re also adding crudini to manage the OpenStack configuration files.

run_ssh_cmd_with_retry $RDO_ADMIN@$CONTROLLER_VM_IP "yum -y install http://dl.fedoraproject.org/pub/epel/6/x86_64/epel-release-6-8.noarch.rpm || true"
run_ssh_cmd_with_retry $RDO_ADMIN@$CONTROLLER_VM_IP "yum install -y crudini"

7. Generate a Packstack configuration file

run_ssh_cmd_with_retry $RDO_ADMIN@$CONTROLLER_VM_IP "packstack --gen-answer-file=$ANSWERS_FILE"

8. Configure the Packstack answer file

Here’s the part relevant to Havana.

run_ssh_cmd_with_retry $RDO_ADMIN@$CONTROLLER_VM_IP "\
crudini --set $ANSWERS_FILE general CONFIG_SSH_KEY /root/.ssh/id_rsa.pub && \
crudini --set $ANSWERS_FILE general CONFIG_NTP_SERVERS 0.pool.ntp.org,1.pool.ntp.org,2.pool.ntp.org,3.pool.ntp.org && \
crudini --set $ANSWERS_FILE general CONFIG_CINDER_VOLUMES_SIZE 20G && \
crudini --set $ANSWERS_FILE general CONFIG_NOVA_COMPUTE_HOSTS $QEMU_COMPUTE_VM_IP && \
crudini --del $ANSWERS_FILE general CONFIG_NOVA_NETWORK_HOST"

run_ssh_cmd_with_retry $RDO_ADMIN@$CONTROLLER_VM_IP "\
crudini --set $ANSWERS_FILE general CONFIG_NEUTRON_L3_HOSTS $NETWORK_VM_IP && \
crudini --set $ANSWERS_FILE general CONFIG_NEUTRON_DHCP_HOSTS $NETWORK_VM_IP && \
crudini --set $ANSWERS_FILE general CONFIG_NEUTRON_METADATA_HOSTS $NETWORK_VM_IP && \
crudini --set $ANSWERS_FILE general CONFIG_NEUTRON_OVS_TENANT_NETWORK_TYPE vlan && \
crudini --set $ANSWERS_FILE general CONFIG_NEUTRON_OVS_VLAN_RANGES physnet1:1000:2000 && \
crudini --set $ANSWERS_FILE general CONFIG_NEUTRON_OVS_BRIDGE_MAPPINGS physnet1:br-eth1 && \
crudini --set $ANSWERS_FILE general CONFIG_NEUTRON_OVS_BRIDGE_IFACES br-eth1:eth1"

9. Deploy our SSH key on the controller

The key will be used by Packstack to automate the SSH connection with all the nodes.

scp -i $SSH_KEY_FILE -o 'PasswordAuthentication no' $SSH_KEY_FILE $RDO_ADMIN@$CONTROLLER_VM_IP:.ssh/id_rsa
scp -i $SSH_KEY_FILE -o 'PasswordAuthentication no' $SSH_KEY_FILE_PUB $RDO_ADMIN@$CONTROLLER_VM_IP:.ssh/id_rsa.pub

10. Run Packstack!

This is obviously the most important step. Note the use of a helper function called run_ssh_cmd_with_retry to retry the command if it fails.
Transient errors in Packstack are quite common due to network connectivity issues, nothing to worry about.

run_ssh_cmd_with_retry $RDO_ADMIN@$CONTROLLER_VM_IP "packstack --answer-file=$ANSWERS_FILE"

11. Add additional firewall rules

Enable access from the Hyper-V host(s) and work around an existing Packstack issue in multinode environments.

run_ssh_cmd_with_retry $RDO_ADMIN@$CONTROLLER_VM_IP "iptables -I INPUT -s $QEMU_COMPUTE_VM_IP/32 -p tcp --dport 9696 -j ACCEPT"
run_ssh_cmd_with_retry $RDO_ADMIN@$CONTROLLER_VM_IP "iptables -I INPUT -s $NETWORK_VM_IP/32 -p tcp --dport 9696 -j ACCEPT"
run_ssh_cmd_with_retry $RDO_ADMIN@$CONTROLLER_VM_IP "iptables -I INPUT -s $NETWORK_VM_IP/32 -p tcp --dport 35357 -j ACCEPT"

if [ -n "$HYPERV_COMPUTE_VM_IP" ]; then
    run_ssh_cmd_with_retry $RDO_ADMIN@$CONTROLLER_VM_IP "iptables -I INPUT -s $HYPERV_COMPUTE_VM_IP/32 -p tcp --dport 9696 -j ACCEPT"
    run_ssh_cmd_with_retry $RDO_ADMIN@$CONTROLLER_VM_IP "iptables -I INPUT -s $HYPERV_COMPUTE_VM_IP/32 -p tcp --dport 9292 -j ACCEPT"
fi

12. Disable API rate limits

This is useful for PoCs and testing environments, but you most probably want to leave API rates in place in production.

>run_ssh_cmd_with_retry $RDO_ADMIN@$CONTROLLER_VM_IP "crudini --set $NOVA_CONF_FILE DEFAULT api_rate_limit False"

13. Enable Neutron firewall

Fixes a Packstack glitch.

run_ssh_cmd_with_retry $RDO_ADMIN@$CONTROLLER_VM_IP "sed -i 's/^#\ firewall_driver/firewall_driver/g' \
/etc/neutron/plugins/openvswitch/ovs_neutron_plugin.ini && service neutron-server restart"

14. Set KVM as the libvirt type on the KVM compute node

When running on a VM, Packstack sets always the libvirt_type to QEMU, which is not what we want.

run_ssh_cmd_with_retry $RDO_ADMIN@$QEMU_COMPUTE_VM_IP "grep vmx /proc/cpuinfo > \
/dev/null && crudini --set $NOVA_CONF_FILE DEFAULT libvirt_type kvm || true"

15. Configure Open vSwitch on the Network node

run_ssh_cmd_with_retry $RDO_ADMIN@$NETWORK_VM_IP "ovs-vsctl list-ports br-ex | grep eth2 || ovs-vsctl add-port br-ex eth2"

16. Reboot all the Linux nodes to load the new 2.6.32 Kernel with network namespaces support

run_ssh_cmd_with_retry $RDO_ADMIN@$CONTROLLER_VM_IP reboot
run_ssh_cmd_with_retry $RDO_ADMIN@$NETWORK_VM_IP reboot
run_ssh_cmd_with_retry $RDO_ADMIN@$QEMU_COMPUTE_VM_IP reboot

17. Install OpenStack on Hyper-V

Configures remotely a Hyper-V external virtual switch and installs the OpenStack compute node with the Nova installer.

$BASEDIR/deploy-hyperv-compute.sh $HYPERV_COMPUTE_VM_IP $HYPERV_ADMIN $HYPERV_PASSWORD $OPENSTACK_RELEASE \
$HYPERV_VSWITCH_NAME $GLANCE_HOST $RPC_BACKEND $QPID_HOST $QPID_USERNAME $QPID_PASSWORD $NEUTRON_URL \
$NEUTRON_ADMIN_AUTH_URL $NEUTRON_ADMIN_TENANT_NAME $NEUTRON_ADMIN_USERNAME $NEUTRON_ADMIN_PASSWORD \
$CEILOMETER_ADMIN_AUTH_URL $CEILOMETER_ADMIN_TENANT_NAME $CEILOMETER_ADMIN_USERNAME $CEILOMETER_ADMIN_PASSWORD \
$CEILOMETER_METERING_SECRET

Here are some details from this script.

Create a Hyper-V external virtual switch using Powershell remotely.

$BASEDIR/wsmancmd.py -U https://$MGMT_IP:5986/wsman -u "$HYPERV_USER" -p "$HYPERV_PASSWORD" \
powershell -NonInteractive -Command '"if (!(Get-VMSwitch | where {$_.Name -eq \"'$SWITCH_NAME'\"})) \
{New-VMSwitch -Name \"'$SWITCH_NAME'\" -AllowManagementOS $false -InterfaceAlias \
(Get-NetAdapter | where {$_.IfIndex -ne ((Get-NetIPAddress -IPAddress \"'$MGMT_IP'\").InterfaceIndex)}).Name}"'

Run the Nova installer remotely in unattended mode.

run_wsmancmd_with_retry $HYPERV_COMPUTE_VM_IP $HYPERV_ADMIN $HYPERV_PASSWORD "msiexec /i %TEMP%\\$MSI_FILE /qn /l*v %TEMP%\\HyperVNovaCompute_setup_log.txt \
ADDLOCAL=$HYPERV_FEATURES GLANCEHOST=$GLANCE_HOST GLANCEPORT=$GLANCE_PORT RPCBACKEND=$RPC_BACKEND \
RPCBACKENDHOST=$RPC_BACKEND_HOST RPCBACKENDPORT=$RPC_BACKEND_PORT RPCBACKENDUSER=$RPC_BACKEND_USERNAME RPCBACKENDPASSWORD=$RPC_BACKEND_PASSWORD \
INSTANCESPATH=C:\\OpenStack\\Instances ADDVSWITCH=0 VSWITCHNAME=$HYPERV_VSWITCH USECOWIMAGES=1 LOGDIR=C:\\OpenStack\\Log ENABLELOGGING=1 \
VERBOSELOGGING=1 NEUTRONURL=$NEUTRON_URL NEUTRONADMINTENANTNAME=$NEUTRON_ADMIN_TENANT_NAME NEUTRONADMINUSERNAME=$NEUTRON_ADMIN_USERNAME \
NEUTRONADMINPASSWORD=$NEUTRON_ADMIN_PASSWORD NEUTRONADMINAUTHURL=$NEUTRON_ADMIN_AUTH_URL \
CEILOMETERADMINTENANTNAME=$CEILOMETER_ADMIN_TENANT_NAME CEILOMETERADMINUSERNAME=$CEILOMETER_ADMIN_USERNAME \
CEILOMETERADMINPASSWORD=$CEILOMETER_ADMIN_PASSWORD CEILOMETERADMINAUTHURL=$CEILOMETER_ADMIN_AUTH_URL \
CEILOMETERMETERINGSECRET=$CEILOMETER_METERING_SECRET"

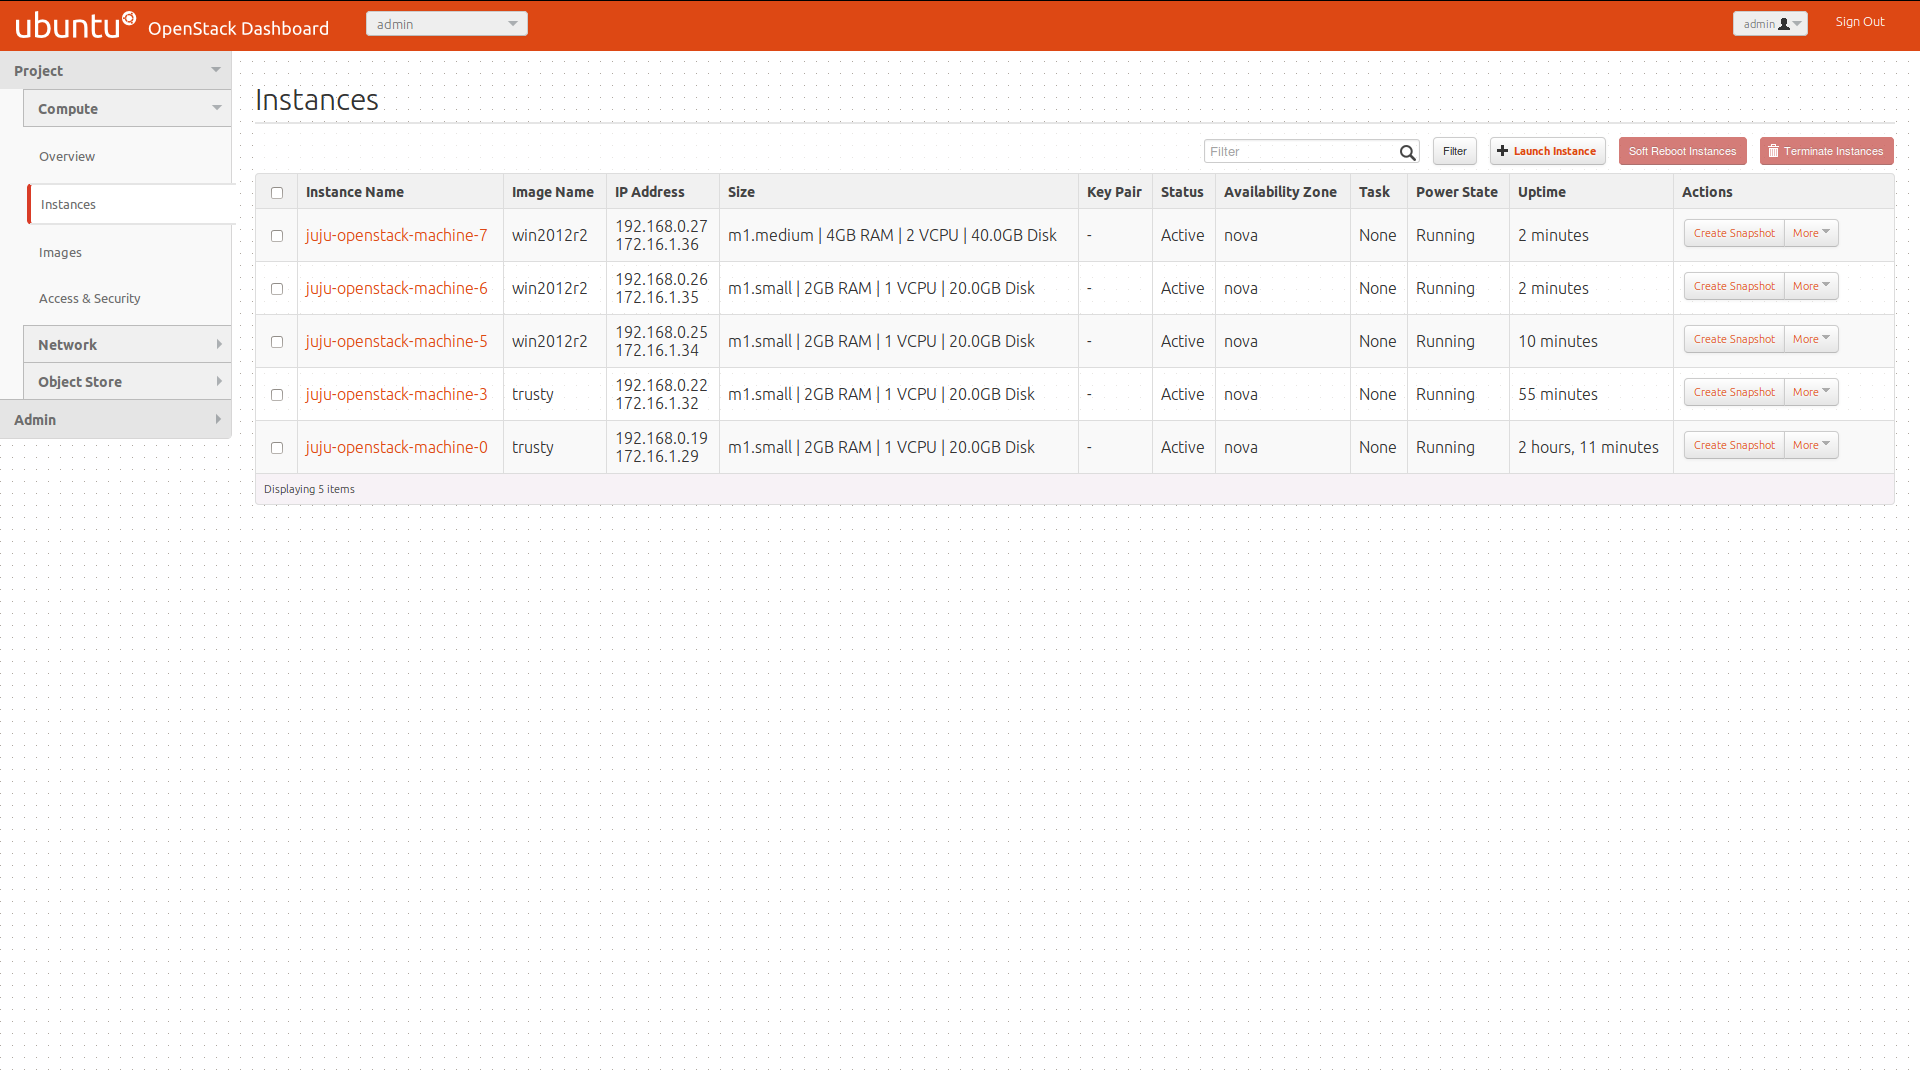
18. Make sure everything is running fine!

Check if all Nova services are running (including the optional KVM and Hyper-V compute nodes):

run_ssh_cmd_with_retry $RDO_ADMIN@$CONTROLLER_VM_IP "source ./keystonerc_admin && nova service-list | \
sed -e '$d' | awk '(NR > 3) {print $10}' | sed -rn '/down/q1'" 10
An finally check that all the Neutron agents are up and running:
run_ssh_cmd_with_retry $RDO_ADMIN@$CONTROLLER_VM_IP "source ./keystonerc_admin && \
neutron agent-list -f csv | sed -e '1d' | sed -rn 's/\".*\",\".*\",\".*\",\"(.*)\",.*/\1/p' | sed -rn '/xxx/q1'" 10

The post Multi-node OpenStack RDO on RHEL and Hyper-V – Part 2 appeared first on Cloudbase Solutions.

Windows authentication without passwords in OpenStack

$
0
0

The usage of passwords is a common practice to authenticate users, but it becomes also a weak point when it comes to password distribution and management of a large number of servers, like for example in an OpenStack cloud (or any type of cloud, for the sake of it).


Background: password-less Linux image deployments

On Linux and other Posix operating systems (OS X,  BSD, etc) this issue has been solved since a long time by using solutions like SSH with pairs of public and private keys, courtesy of asymmetric cryptographic algorithms like the ubiquitous RSA.

The main idea is that the private key is kept secret by the user, while the public key can be accessed by anyone.

OpenStack guest authentication is commonly based on this model, with keypairs managed by Nova and easily handled via the Horizon dashboard or the command line.

When a guest boots, the public key belonging to a given keypair is shared between the OpenStack environment and the guest via metadata, which is simply a json encoded dictionary and some additional files accessible by the guest via HTTP or other means.

Although it is possible (and unfortunately common) to provide passwords in clear text inside of the metadata, this is definitely not a good idea. On the other side, putting an SSH public key has no security implications, as by definition the key is public. Once the key has been deployed inside of the guest by cloud-init or other tools, the user can authenticate with her/his private key.


WinRM: Windows native alternative to SSH

Most Windows users probably never heard about it, but Windows contains a little jewel called Windows Remote Management (WinRM), included with every version of the OS since Windows Server 2008 / Windows Vista and also available as a free additional download for Windows Server 2003 and Windows XP.

WinRM is considered as the Windows equivalent of SSH in most scenarios. The communication between clients and servers is based on the WS-Management (WSMan) open standard (a SOAP protocol), which means that it is not limited to Windows only. We are actually using it a lot to automate OpenStack deployments from Linux on Hyper-V, just as an example.

When used together with a remote PowerShell session, you’ll see that not only it is possible to manage a Windows host remotely, but it’s also a great experience once you see what PowerShell is capable of.

WinRM supports various forms of authentication (Basic, Digest, Kerberos and Certificate) and various transport protocols, including HTTP and HTTPS.

So, why isn’t WinRM hugely popular today, like, for example, SSH? My two cents here are that it’s notoriously complicated to configure, on both servers and clients, to the point that it remained matter for initiated sysadmins…

… until we released the solution described below. :-)


Cloudbase-Init and WinRM

The main idea behind the development of cloudbase-init, was to bring the approach commonly available on Linux with cloud-init to Windows (you can learn more about it here). This means that once a guest Windows instance gets deployed in a cloud, cloudbase-init takes care of all the configuration details: setting the hostname, creating users and setting passwords, expanding file systems, running custom scripts, deploying heat templates and more.

The great news is that we just added two new features that automate completely the WinRM configuration, without a single action required from the user side.

You can get the Cloudbase-Init directly from here and we provide also official Windows Server 2012 R2 Evaluation images ready to be deployed in OpenStack.


WS 12 R2 Eval - OpenStack

WinRM HTTPS Listener

The ConfigWinRMListenerPlugin configures a WinRM HTTPS listener with a self signed certificate generated on the spot and enables (optionally) basic authentication, which means that a secure communication channel can be established between any client and the server being provisioned, without the requirement of having both the client and the server in the same domain.  A firewall rule is added by cloudbase-init in the Windows firewall for TCP port 5986.

A this point you can login into your server. To begin with, don’t forget to add a rule to your security groups in OpenStack!

nova secgroup-add-rule default tcp 5986 5986 0.0.0.0/0

Get the admin password for the instance:

nova get-password yourinstance ~/.ssh/your_ssh_rsa_key

On your client connect to your instance as shown in the following PowerShell snippet:

$ComputerName = "yourserveraddress"
# Provide your username and password (by default "Admin" and the password you just obtained)
$c = Get-Credential
$opt = New-PSSessionOption -SkipCACheck -SkipCNCheck -SkipRevocationCheck
$session = New-PSSession -ComputerName $ComputerName -UseSSL -SessionOption $opt -Authentication Basic -Credential $c
Enter-PSSession $session

What about Linux and OS X clients?

First download wsmancmd.py, and install pywinrm, a great and simple open source Python WSMan implementation. Now just run any remote Windows command from Linux or OS X:

wsmancmd.py -U https://your_host:5986/wsman -u your_user -p your_password 'powershell -Command Get-NetIPConfiguration'

At this point you’ll be connected to the remote host and all the commands will be executed remotely. You can change your user’s password, create additional users, configure the server, etc.


Here’s a snapshot showing a PowerShell command executed remotely from an Ubuntu client:

WinRM_Ubuntu_client


We still have one issue: we needed a password to authenticate. How to avoid it altogether?


WinRM HTTPS certificate authentication

Unlike the simple public / private keypairs used by SSH in OpenStack, WinRM uses X509 certificates for authentication.

Certificates are also associated with a keypair. The “public” certificate (without the private key) is part of the X509 certificate, in our case distributed in a base64 encoded format (PEM).

The private key and the certificate are typically packaged in a password protected #PKCS12 file (.pfx or .p12 extension).

The following Bash script, available here, generates a self signed certificate and both pem and pfx files for you. It will ask for a password which is used to protect the pfx file. Take note of it, you’ll need it on the client to import the certificate.

./create-winrm-client-cert.sh "cloudbase-init-example" your_cert.pfx

At this point you have two certificate files: your_cert.pfx and your_cert.pem.

The certificate provisioning on the Windows guest is done by the ConfigWinRMCertificateAuthPlugin in the Cloudbase-Init service, all we need is to pass a public X509 PEM file to it. How can we do that? There are two options today:

The first one consists in passing the PEM file as user_data script to the Nova boot command.

You can do it in Horizon by pasting the PEM file contents as shown in the following snapshot:

OpenStack certificate in user_data

Or with the command line equivalent:

nova boot --flavor 2 --image your_windows_image --key-name key1 vm1 \
--user_data=your_cert.pem

Although this is very simple and effective, it might become a problem if you already need to employ the user_data for other reasons, e.g. running a custom script or deploying a Heat template.

In that case we can use the custom metadata option, but since custom metadata fields can be maximum 255 characters long, we need to split the certificate in multiple fields. It’s clearly a bit cumbersome, so expect hopefully some new options in the upcoming OpenStack releases!

declare -a CERT=(`openssl x509 -inform pem -in your_cert.pem -outform der | \
base64 -w 0 | sed -r 's/(.{255})/\1\n/g'`)

nova boot  --flavor 2 --image "your_windows_image" --key-name key1 vm1 \
--meta admin_cert0="${CERT[0]}" \
--meta admin_cert1="${CERT[1]}" \
--meta admin_cert2="${CERT[2]}" \
--meta admin_cert3="${CERT[3]}" \
--meta admin_cert4="${CERT[4]}"

We’re almost done. On your client you need to install the certificate, including the private key. Since the pfx file is password protected, you can transfer it on any media, including HTTP, email or else.

Here’s a PowerShell script to simplify the process. It will ask for your pfx file password to import the certificate in your “Personal” X509 store. Take note of the certificate subject shown in output, you’ll need it in the next step.

.\ImportPfx.ps1 -path your_cert.pfx


Now you’re ready to connect! Use the following PowerShell script to get a remote PowerShell session using your certificate:

Et voilà, you’re in a password-less remote session on your Windows instance. :-)

PowerShell certificate authentication

The post Windows authentication without passwords in OpenStack appeared first on Cloudbase Solutions.

OpenStack Havana 2013.2.2 Hyper-V compute installer released!

$
0
0

Following the recent announcement last Friday of the availability of OpenStack Havana release 2013.2.2, we’re glad to announce that the Havana 2013.2.2 Hyper-V Nova compute installer is available for download.


Hyperv_nova_2013_2_2

Installing it is amazingly easy as usual, just get the free Hyper-V Server 2008 R2 / 2012 / 2012 R2 or enable the Hyper-V role on Windows Server 2008 R2 / 2012 / 2012 R2 and start the installer. No need for additional requirements!

If you prefer to deploy OpenStack on Hyper-V via Chef, Puppet, SaltStack or group policies, here’s how to execute the installer in unattended mode.


How to get started?

Your Hyper-V compute nodes can be added to any Havana OpenStack cloud, for example based on Ubuntu or RDO on RHEL/CentOS. As soon as the installer is done you’ll see the new compute node in your cloud, no need for anything else.


What type of guest instances can I run on Hyper-V?

Windows, Linux or FreeBSD instances. Another key advantage is that beside Windows, most modern Linux distributions come already with the Hyper-V integration components installed, no need to deploy additional tools or drivers. Just make sure that your Glance images are in VHD or VHDX format!

A typical use case consists in running multiple hypervisors in your OpenStack cloud, for example KVM for Linux guests and Hyper-V for Windows guests.

If you’d like to test how Windows images run on OpenStack, here are the official Microsoft OpenStack Windows Server 2012 R2 evaluation images ready for download.


Licensing and support

Hyper-V 2012 R2 is free and provides all the hypervisor related features that you can find on Windows Server 2012 R2 with no memory or other usage limitations.

If you want to run Windows guests you might want to check out the Microsoft SPLA and Volume Licensing options (this applies to any hypervisor, not only Hyper-V). By using Windows Server Datacenter licenses, which provide unlimited virtualization rights, you might be surprised to see how cheap licensing can be!

Please note that based on your licensing agreement, Microsoft provides full support for your Windows virtual machines running on Hyper-V. This is rarely the case if you decide to run Windows on KVM, unless your stack is listed in the Microsoft SVVP program!


Release Notes

Beside the upstream Nova, Neutron and Ceilometer components updated for 2013.2.2, we also added to this release additional bug fixes that already landed in Icehouse but whose backporting to Havana still needs to be merged or that are still in the process of being merged. Here’s the full list:


Nova

Neutron

Ceilometer


The road to Icehouse

Would you like to test how our latest bits work, maybe by using Devstack? Our Icehouse beta installer is packaged and released automatically anytime a new patch lands in Nova, Neutron or Ceilometer.


The post OpenStack Havana 2013.2.2 Hyper-V compute installer released! appeared first on Cloudbase Solutions.


OpenStack Windows instances, Puppet and Heat

$
0
0

Putting together OpenStack and Puppet is a great way to satisfy almost any deployment scenario. There are a lot of resources on the web about how to set up such an infrastructure, but mostly Linux related. The main goal of this blog post is to provide a reference on how to deploy the Puppet agent on a Windows instance using either plain simple Nova metadata or a Heat template, in both cases based on Cloudbase-Init.

One of the great advantages that Puppet provides is that you can reduce to the bare minimum the OpenStack orchestration complexity leaving to Puppet the role of configuring the instances. This provides a lot of flexibility, for example in the way in which Heat and Puppet can be mixed to achieve the desired results.

To begin with, how do we install the Puppet agent on Windows? On Linux we can use rpm or deb packages directly included in our distributions, but this does not apply to Windows. For this purpose, PuppeLabs provides a Windows installer available for both the standard and enterprise versions, which can be either installed with the typical “Next, Next, Finish” UI or in fully unattended mode. The installer takes care of all the requirements, including the Ruby environment and so on. All we need to do is to provide the location of our Puppet master server. The Microsoft MSI packaging provides a seamless unattended automation:

msiexec /qn /i puppet.msi /l*v puppet.log PUPPET_MASTER_SERVER=your.puppet.master

Beside PUPPET_MASTER_SERVER, there are also other properties that you can use to customize your installation. The full documentation for the agent installation can be found on the PuppetLabs web site.

There’s a minor caveat to be considered when providing the Puppet Master host name or fqdn (no IP addresses allowed): make sure that the name matches the common name or one of the subject alternative names of the X509 certificate in use on the Puppet Master. You can easily check the certificate by connecting to https://your.puppet.master:8140 and check the certificate properties. If you cannot resolve the name, just add an entry in your hosts file.
 

OpenStack instance user_data

Putting everything together in a PowerShell script to be provided as a user_data script to the instance is easy:

#ps1_sysnative
$ErrorActionPreference = "Stop"

$puppet_master_server_name = "puppet"
# Provide an IP address only if you need to add a host file entry
$puppet_master_server_ip = "10.0.1.2"

# For Puppet Enterprise replace the following url with:
# "https://pm.puppetlabs.com/cgi-bin/download.cgi?ver=latest&dist=win"
$puppet_agent_msi_url = "https://downloads.puppetlabs.com/windows/puppet-3.4.3.msi"

if ($puppet_master_server_ip) {
    # Validate the IP address
    $ip = [System.Net.IPAddress]::Parse($puppet_master_server_ip)
    # Add a line to the hosts file
    Add-Content -Path $ENV:SystemRoot\System32\Drivers\etc\hosts -Value "$puppet_master_server_ip $puppet_master_server_name"
}

$puppet_agent_msi_path = Join-Path $ENV:TEMP puppet_agent.msi

# You can also use Invoke-WebRequest but this is way faster :)
Import-Module BitsTransfer
Start-BitsTransfer -Source $puppet_agent_msi_url -Destination $puppet_agent_msi_path

cmd /c start /wait msiexec /qn /i $puppet_agent_msi_path /l*v puppet_agent_msi_log.txt PUPPET_MASTER_SERVER=$puppet_master_server_name
if ($lastexitcode) {
    throw "Puppet agent setup failed"
}

del $puppet_agent_msi_path

The above script can be downloaded from here. The first line (#ps1 or #ps1_sysnative) is very important, as it tells Cloudbase-Init that this is a PowerShell script.

You can now easily boot an OpenStack instance by either using the Horizon Dashboard or the command line:

nova boot --flavor m1.small --image "Windows Server 2012 Std Eval" --key-name key1 \
--user-data PuppetAgent.ps1 vm1

If you don’t have a Windows image in Glance which includes Cloudbase-Init, you can either download a ready made Windows Server 2012 R2 Evaluation image or create your own image by following this guide.

Once the machine is booted, you should be able to see a pending certificate in your Puppet Master with:

puppet cert list

which can be signed with:

puppet cert sign your.instance.name

Your instance / node will start applying the desired configuration with the next run (every 30′ by default). If this sounds new, here’s a great beginner’s guide.


A Heat template

If you want to include the deployment of the Puppet agent in a larger deployment scenario, Heat is a great choice.

You can find here a Heat template that includes the above PowerShell script. Here’s an example of how to use it to deploy a stack:

heat stack-create puppet-stack-1 --template-file=puppet-agent.template \
--parameters="KeyName=key1;InstanceType=m1.small;SubnetId=$SUBNET_ID;WindowsVersion=WS12R2;PuppetMasterServer=puppet"

The post OpenStack Windows instances, Puppet and Heat appeared first on Cloudbase Solutions.

FreeRDP HTML5 proxy on Windows

$
0
0


FreeRDP-WebConnect is an open source HTML5 proxy that provides web access to any Windows server and workstation using RDP. The result is amazing, especially considering that no native client is required, just a plain simple web browser!


Platform support

HTML5 has came a long way in the last few years, with any major web browser (including mobile platforms) supporting WebSockets, the underlying communication mechanism employed by FreeRDP-WebConnect.

Here’s a list of supported desktop and mobile browsers:

  • FireFox >= 11.0
  • Chrome >= 16.0
  • Internet Explorer >= 10
  • Safari >= 6
  • Opera >= 12.10
  • Safari Mobile >= 6
  • Android Browser >= 4.4

Supported client desktop OSs:

Windows, OS X, Linux

The FreeRDP-WebConnect service itself can be installed on most recent Linux distributions and on every x86 and x64 Windows versions starting with Windows Server 2008:

  • Windows Server 2008 / Windows Vista
  • Windows Server 2008 R2 / Hyper-V Server 2008 R2 / Windows 7
  • Windows Server 2012 / Hyper-V Server 2012 / Windows 8
  • Windows Server 2012 R2 / Hyper-V Server 2012 R2 / Windows 8.1


How to install FreeRDP-WebConnect on Windows

The installation on Windows is really easy. To begin with, download the installer from our website and run it:


freerdp_installer_1


Accept the license, select the installation type and optionally change the install location:


freerdp_installer_3


Next comes the HTTP and HTTPS configuration. You can just accept the defaults and go on with “Next” or replace the options to match your environment. Make sure to choose ports not used by other services. The installer will create a self signed certificate for HTTPS, no need to worry about it. Windows firewall rules are also automatically created if enabled.


freerdp_installer_4


The OpenStack settings are required only if you intend to use this service with OpenStack, otherwise you can skip them. Authentication URL, tenant name, username and password can be retrieved from your OpenStack deployment, while the Hyper-V host username and password are required to connect to RDP consoles and can be either local or domain credentials.


freerdp_installer_5


We’re done with the configuration, press “Next” and the the installer will complete the installation.


freerdp_installer_8


Once done, point your browser to “http://localhost:8000″ (or a different port if you changed it above) and you’ll see the initial connection screen (using Chrome on OS X in this example, but any of the options listed above is also valid):

Screen Shot 2014-05-11 at 17.39.58

Set the host, username and password and click connect:

Screen Shot 2014-05-11 at 18.20.51

That was it, connected! A native client will still have an edge in terms of performance, but for a lot of scenarios a pure web client enables an amazing whole lot of new possibilities!


Integration with OpenStack

We integrated RDP support in Icehouse, on both Nova and Horizon. All you have to do to make it work is to specify the url of your FreeRDP-WebConnect service in the Hyper-V Nova compute nodes as detailed below and restart the nova-compute service. The Hyper-V Nova compute installer takes care of these settings as well of course!

[rdp]
enabled=True
html5_proxy_base_url=http://10.0.0.1:8000/

The post FreeRDP HTML5 proxy on Windows appeared first on Cloudbase Solutions.

Windows support in Ubuntu Juju, MaaS and OpenStack

$
0
0

We’re very pleased to announce a new partnership between Cloudbase Solutions and Canonical for bringing Windows support in Juju and Maas.

Canonical’s Mark Shuttleworth showed a great demo of OpenStack integration with Hyper-V along with Active Directory, SQL Server and SharePoint Juju charms during the OpenStack summit keynote in Atlanta, providing a clear idea of the huge potential of this partnership. Thanks to this joint effort it will be soon possible to orchestrate Windows based deployments at any scale in an amazing way.

Juju provides it’s magic via charms, a very innovative way of defining deployments and relationships between components. For example the following screenshot of the Juju user interface clearly shows how easy it is to create a SharePoint server deployment by simply creating a relationship with an Active Directory controller and a SQL Server instance:


Juju and SharePoint


We already have complete Juju charms for:

  • Active Directory
  • IIS
  • SQL Server
  • Exchange
  • SharePoint
  • Lync
  • Hyper-V OpenStack Compute

And a lot more to come!

Fault tolerance and scalability are a top priority for us, so our charms will support load balancing, clustering, SQL Server mirroring and other HA solutions.

All our charms support both bare metal and OpenStack virtualized deployments on any OpenStack hypervisor, including KVM, Hyper-V, vSphere / ESXi and more.

Here’s a snapshot showing how the SharePoint deployment pictured above translates in OpenStack virtual instances (click on the image to see the details):


SharePoint Juju OpenStak instances


We also introduced Windows bare metal deployment in MaaS, starting with Windows Server 2008 and up to Windows Server 2012 R2, including Hyper-V Server, along with all supported workstation operating systems, where Windows 7, 8 and 8.1 provide great value for VDI scenarios.

This is just the beginning, we’re planning to include mixed deployments with both Windows and Linux (Ubuntu, CentOS) and way more, defining a whole new way to orchestrate the enterprise IT at any level!


The post Windows support in Ubuntu Juju, MaaS and OpenStack appeared first on Cloudbase Solutions.

Open vSwitch on Hyper-V

$
0
0

I’m very excited to announce the availability of the Open vSwitch porting to Microsoft Hyper-V Server beta release. This effort enables a whole new set of interoperability scenarios between Hyper-V and cloud computing platforms like OpenStack where Open vSwitch (OVS) is a very common SDN choice.

The porting includes all the Open vSwitch userspace tools and daemons (e.g. ovs-vsctl, ovs-vswitchd), the OVSDB database and a newly developed Hyper-V virtual switch forwarding extension, with the goal of providing the same set of tools available on Linux with a seamless integration in the Hyper-V networking model, including fully interoperable GRE and VXLAN encapsulation.

As usual, we also wanted to make the user experience as easy as possible, so we released an MSI installer that takes care of installing all the required bits, including Windows services for the obsdb-server and ovs-vswitchd daemons.

All the Open vSwitch code is available as open source:

https://github.com/cloudbase/openvswitch-hyperv

Supported Windows operating systems:

  • Windows Server and Hyper-V Server 2012 and 2012 R2
  • Windows 8 and 8.1


Installing Open vSwitch on Hyper-V

The entire installation process is seamless. Download our installer and run it. You’ll be welcomed by the following screen:


OVSHVSetup1


Click “Next”, accept the license, click “Next” again and you’ll have the option to install both the Hyper-V switch and  command line tools. In case you’d like to install the command line tools only  to connect remotely to a Windows or Linux OVS server, just deselect the driver option.


OVSHVSetup3


Click “Next” followed by “Install” and the installation will start. You’ll have to confirm that you want to install the signed kernel driver and the process will complete in a matter of a few seconds, generating an Open vSwitch database and starting the obsdb-server and ovs-vswitchd services.


OVSHVSetup3_1


The installer adds also the command line tools folder to the system path, but you’ll have to logoff and logon to benefit from it (this is unfortunately a Windows limitation).


Unattended installation

Fully unattended installation is also available in order to install Open vSwitch with Windows GPOs, Puppet, Chef, SaltStack, Windows DSM or any other automated deployment solution:

msiexec /i openvswitch-hyperv-installer.msi /l*v log.txt


Configuring Open vSwitch on Windows

The OVS command line tools have been fully ported, so you can expect the same user experience that you would have on Linux, with only a few important distinctions in how the switch ports are handled since here we have Hyper-V virtual switch ports instead of tap devices.

To begin with, we need to create a Hyper-V virtual switch with a port on the host OS (this is a limitation that will be removed remove soon, currently required for managing local tunnel endpoints traffic):

New-VMSwitch external -AllowManagementOS $true -NetAdapterName Ethernet1

In this example the switch is called external, but feel free to rename it as you prefer.

“Large Send Offload” needs to be disabled on the virtual host adapter for performance reasons:

Set-NetAdapterAdvancedProperty "vEthernet (external)" -RegistryKeyword "*LsoV2IPv4" -RegistryValue 0
Set-NetAdapterAdvancedProperty "vEthernet (external)" -RegistryKeyword "*LsoV2IPv6" -RegistryValue 0

We can now enable the OVS extension on the external virtual switch:

Enable-VMSwitchExtension "openvswitch extension" external

and finally create an OVS switch called br0 associated with our Hyper-V switch:

ovs-vsctl.exe add-br br0
ovs-vsctl.exe add-port br0 external


To provide a real world example, let’s take a typical scenario where networking between virtual machines running on multiple KVM and Hyper-V nodes needs to be established via GRE or VXLAN tunnels. The following example shows how to configure a Hyper-V node in order to connect to two existing KVM nodes named KVM1 and KVM2.


KVM1 OVS configuration

KVM1 provides two tunnels with local endpoint 10.13.8.2:

  • vxlan-1 connected to Hyper-V (10.13.8.4)
  • gre-2 connected to KVM2 (10.13.8.3)
ovs-vsctl show
d128025c-0bc8-4e4e-834b-c95f2fe5ed01
    Bridge br-tun
        Port "vxlan0"
            Interface " vxlan-1"
                type: vxlan
                options: {in_key=flow, local_ip="10.13.8.2", out_key=flow, remote_ip="10.13.8.4"}
        Port "gre-2"
            Interface "gre-2"
                type: gre
                options: {in_key=flow, local_ip="10.13.8.2", out_key=flow, remote_ip="10.13.8.3"}
        Port "qvo5c5a7843-05"
            Interface "qvo5c5a7843-05"
        Port br-tun
            Interface br-tun
                type: internal
 

KVM2 OVS configuration

KVM2 provides one tunnel with local endpoint 10.13.8.3:

  • gre-1 connected to Hyper-V (10.13.8.4).
ovs-vsctl show
ff0d7fb7-6837-4ca0-aa3f-6a19548c9245
    Bridge br-tun
        Port "qvo18d9d6c5-74"
            Interface "qvo18d9d6c5-74"
        Port br-tun
            Interface br-tun
                type: internal
        Port "gre-1"
            Interface "gre-1"
                type: gre
                options: {in_key=flow, local_ip="10.13.8.3", out_key=flow, remote_ip="10.13.8.4"}
 

Hyper-V OVS configuration

The Ip address assigned to the “vEthernet (external)” adapter is 10.13.8.4.

Let’s start by creating the VXLAN tunnel:

ovs-vsctl.exe add-port br0 vxlan-1
ovs-vsctl.exe set Interface vxlan-1 type=vxlan
ovs-vsctl.exe set Interface vxlan-1 options:local_ip=10.13.8.4
ovs-vsctl.exe set Interface vxlan-1 options:remote_ip=10.13.8.2
ovs-vsctl.exe set Interface vxlan-1 options:in_key=flow
ovs-vsctl.exe set Interface vxlan-1 options:out_key=flow

and now the two GRE tunnels:

ovs-vsctl.exe add-port br0 gre-1
ovs-vsctl.exe set Interface gre-1 type=gre
ovs-vsctl.exe set Interface gre-1 options:local_ip=10.13.8.4
ovs-vsctl.exe set Interface gre-1 options:remote_ip=10.13.8.3
ovs-vsctl.exe set Interface gre-1 options:in_key=flow
ovs-vsctl.exe set Interface gre-1 options:out_key=flow

ovs-vsctl.exe add-port br0 gre-2
ovs-vsctl.exe set Interface gre-2 type=gre
ovs-vsctl.exe set Interface gre-2 options:local_ip=10.13.8.4
ovs-vsctl.exe set Interface gre-2 options:remote_ip=10.13.8.2
ovs-vsctl.exe set Interface gre-2 options:in_key=flow
ovs-vsctl.exe set Interface gre-2 options:out_key=flow

As you can see, all the commands are very familiar if you are already used to OVS on Linux.

As introduced before, the main area where the Hyper-V implementation differs from the Linux counterpart is in how virtual machines are attached to a given OVS port. This is easily accomplished by using the Set-VMNetworkAdapterOVSPort PowerShell cmdlet provided with the installer.

Let’s say that we have two Hyper-V virtual machines called VM1 and VM2 and that we want to connect them to the switch. All we have to do for each network adapter is a VM is to connect it to the external switch as you would normally do, assign it to a given OVS port and create the corresponding port in OVS:

$vnic = Get-VMNetworkAdapter VM1
Connect-VMNetworkAdapter -VMNetworkAdapter $vnic -SwitchName external
$vnic | Set-VMNetworkAdapterOVSPort -OVSPortName ovs-port-1
ovs-vsctl.exe add-port br0 ovs-port-1

Here’s how the resulting OVS configuration looks like on Hyper-V after connecting VM1 and VM2 to the switch:

ovs-vsctl.exe show
3bc682a9-1bbd-4f98-b8a6-22f21966e2f5
    Bridge "br0"
        Port "ovs-port-2"
            Interface "ovs-port-2"
        Port "ovs-port-1"
            Interface "ovs-port-1"
        Port "gre-1"
            Interface "gre-1"
                type: gre
                options: {in_key=flow, local_ip="10.13.8.4", out_key=flow, remote_ip="10.13.8.3"}
        Port "gre-2"
            Interface "gre-2"
                type: gre
                options: {in_key=flow, local_ip="10.13.8.4", out_key=flow, remote_ip="10.13.8.2"}
        Port "vxlan0"
            Interface "vxlan-1"
                type: vxlan
                options: {in_key=flow, local_ip="10.13.8.4", out_key=flow, remote_ip="10.13.8.2"}
        Port external
            Interface external
        Port "br0"
            Interface "br0"
                type: internal

Networking is now fully functional between KVM and Hyper-V hosted virtual machines!

Further control can be accomplished by applying flow rules, for example by limiting what port / virtual machine can be accessible on each VXLAN or GRE tunnel. We’ll write more on this topic in a future article on OpenStack Neutron integration.


Notes

Like every project in beta status, the Open vSwitch porting has still bugs that need to be fixed. The kernel extension, like any other kernel level code, can generate blue screens or freezes in case of issues, so don’t use the beta releases on production systems!

Known issues currently being fixed :

  • In some conditions with heavy network traffic, uninstalling the driver might cause a crash
  • Switch traffic might become unavailable after some hours of usage
  • Performance on GRE tunnels needs improvements :-)

The beta installer is built by our Jenkins servers every time a new commit lands in the project repositories, so expect frequent updates.


The post Open vSwitch on Hyper-V appeared first on Cloudbase Solutions.

How to set Hyper-V promiscuous mode for monitoring external traffic

$
0
0

A Hyper-V related question that shows regularly up in the forums is how to setup virtual switch ports in promiscuous mode so that external traffic can be received / monitored on the host’s root partition or on virtual machines.

Hyper-V 2012 introduced the concept of port monitoring (also called port mirroring) which can be enabled on any virtual machine network adapter or on the host. The interesting part is that there’s quite some official documentation available if you want to setup port monitoring / mirroring between two or more VMs, but you are almost on your own if you want to capture traffic coming from an external network or from the host root partition. PowerShell APIs, which do a great job in setting up port monitoring between VMs, are quite convoluted and obscure when it comes to host monitoring settings.

This blog post has the purpose of explaining how to handle non trivial Hyper-V promiscuous mode requirements and introduces a simple PowerShell module to easily handle port monitoring settings on the host.

How does port monitoring / mirroring work?

The Hyper-V port monitoring functionality is already well explained elsewhere, so I’ll keep the basics to the minimum here. In short, unlike other virtualization solutions like VMWare ESXi where you set an entire virtual switch or group of ports in promiscuous mode, in Hyper-V you need to enable monitoring on each switch port individually, for either VM network adapters (vNICs) or host adapters (NICs).

Furthermore, Hyper-V does not let you simply set a “promiscuous mode” flag on a port, as you need to specify if a given port is supposed to be the source or the destination of the network packets, “mirroring” the traffic, hence the name.

The Hyper-V PowerShell module does a great job in making life easy from this perspective, for example:

Set-VMNetworkAdapter MyVM -PortMirroring Destination

where -PortMirroring can be Source, Destination or None. If you have multiple adapters on a VM you’d most probably want to choose which adapter to configure:

Get-VMNetworkAdapter MyVM | ? MacAddress -eq 'xxxxxxxx' | Set-VMNetworkAdapter MyVM -PortMirroring Destination

What about external traffic?

There are quite a few scenarios where you want to be able to receive on a VM all the traffic coming from an external network. Some of the most typical use cases include network intrusion detection systems (NIDS), monitoring tools (Wireshark, Message Analyzer, tcpdump, etc) or software defined networking (SDN) routers / switches, like for example Open vSwitch.

The PowerShell cmdlets (Add-VMSwitchExtensionPortFeature, Get-VMSystemSwitchExtensionPortFeature, etc) that can be used to manage port monitoring at the host level are not exactly user friendly and don’t cover all the relevant uses cases when it comes to internal ports. Beside the reference documentation, there are a few forum posts providing some info on how to use them, but not much more at the time of writing. Here’s an example for setting the port monitoring mode of a switch host NIC to source:

$portFeature=Get-VMSystemSwitchExtensionPortFeature -FeatureName "Ethernet Switch Port Security Settings"
# None = 0, Destination = 1, Source = 2
$portFeature.SettingData.MonitorMode = 2
Add-VMSwitchExtensionPortFeature -ExternalPort -SwitchName MySwitch -VMSwitchExtensionFeature $portFeature

With the above example, all traffic passing on the external network NIC of MySwitch will be “mirrored” to any VM whose port monitoring mode has been set to destination.

Internal switches and shared for management NICs

There are two scenarios which are not covered by the previous example: internal switches, used manly for root partition / guest communication and external switches shared for management (i.e. created with New-VMSwitch -ManagementOS $true in PowerShell).

In those cases the above example becomes:

$portFeature=Get-VMSystemSwitchExtensionPortFeature -FeatureName "Ethernet Switch Port Security Settings"
# None = 0, Destination = 1, Source = 2
$portFeature.SettingData.MonitorMode = 2
Add-VMSwitchExtensionPortFeature -ManagementOS -VMSwitchExtensionFeature $portFeature

By specifying -ManagementOS it becomes unfortunately not possible to specify the switch, so the monitoring mode will be set for every internal switch and shared management NIC port on the host!

An easier way to set host NIC monitoring mode in PowerShell

The complications and limitations of the PowerShell cmdlets outlined above led to writing a simplified set of PowerShell commands, where enabling port monitoring on external or internal switches gets as simple as:

Import-Module .\VMSwitchPortMonitorMode.psm1
Set-VMSwitchPortMonitorMode -SwitchName MySwitch -MonitorMode Source

The module is available here.

How to check the status of port monitoring on a given switch:

PS C:\Dev> Get-VMSwitchPortMonitorMode MySwitch
PortType   MonitorMode
--------   -----------
External   Source

Disabling monitoring is also very easy:

Set-VMSwitchPortMonitorMode -SwitchName MySwitch -MonitorMode None

In case of external switches shared for management, you can set different port monitoring settings for the external and internal NICs by simply adding the -PortType parameter specifying either Host or Internal.

How to monitor VLAN tagged traffic?

Traffic generated on a VM with a vNIC set to tag traffic with a VLAN id cannot be directly monitored on another VM, unless trunking is set on the target. For example, let’s say that we want to monitor the traffic between two VMs (VM1 and VM2) on a third VM (VM3), with packets tagged with VLAN id 100.

VM1 and VM2:

Set-VMNetworkAdapterVlan VM1 -Access -VlanId 100
Set-VMNetworkAdapter VM1 -PortMirroring Source

Set-VMNetworkAdapterVlan VM2 -Access -VlanId 100
Set-VMNetworkAdapter VM2 -PortMirroring Source

VM3 (monitoring):

Set-VMNetworkAdapterVlan VM3 -Trunk -AllowedVlanIdList "100,101"  -NativeVlanId 0
Set-VMNetworkAdapter VM3 -PortMirroring Destination

Monitoring traffic on VM3 while pinging VM2 from VM1 will show something like the following tcpdump output, where the packets 802.1Q (VLAN) info is highlighted by the red ellipse:

Hyper-V tcpdump VLANs 2

The post How to set Hyper-V promiscuous mode for monitoring external traffic appeared first on Cloudbase Solutions.

Viewing all 83 articles
Browse latest View live